Hello there! So, remember a few days ago when I posted that my friend Erica and I were hosting an Instagram hop to push us over the milestone of 10K followers, (and that fun “swipe up” feature!)? Well, we did and we did! We had an amazing line-up of fellow paper crafter artists and they posted so many inspiring cards, and it was awesome!
Today I wanted to say thank you too, to everyone here, my lovely Blog friends! You are always encouraging and leave the nicest comments and that just makes the paper messes and ink stained fingers and late night deadline beater sessions all worth it!

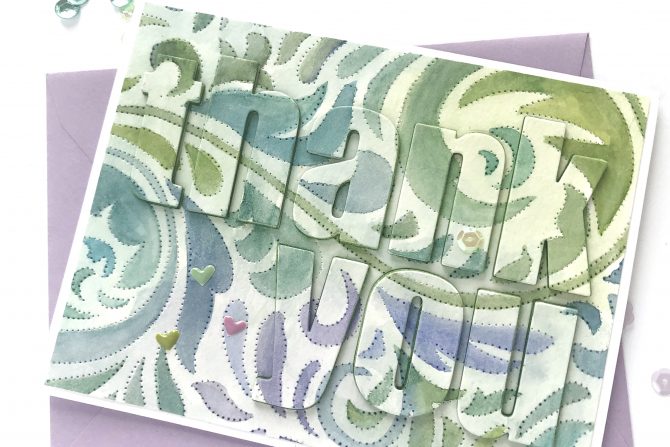
I made this thank you card by running an A2 sized watercolor card stock panel through the die cutting machine with the Dotted Swirls Debossing Die from Altenew. It’s a very pretty background feature that I’ve used before, here and here, but today I wanted to highlight it even more.

I decided to elevate the dotted swirls design by watercolor painting it. I used both the Artist Watercolor 24 Paint pans and the 36 Paint pan sets together, because they just compliment each other so well. I didn’t use any of the paint colors straight from the pan though; instead I started by cleaning out the paint wells from several previous paint sessions and going from there.

For example, I would start with a green/blue mix of paint, then swish a little more blue into it, paint a few sections, add some yellow to that mix, paint some more, add a different shade of blue, paint on, until I even found myself mixing up a little blue/grey/lavender! And that was a fun surprise!

After the sections were all painted, I diluted what was left and started painting over the whole background. As I hit different areas, some of the previously dry paint would reactivate and add to the mix. I’m not sure I could ever reproduce this exactly, but then again, I wouldn’t want to either! The more times you try, the more interesting and beautiful mixes you’d come up with!

At this point I also knew I didn’t want to cover up or lose any of that beautiful painted panel, so I decided to keep it simple and die cut the Bold Alphabet Dies block letters spelling “thank you”, pop them up with some fun foam die cut letters behind and glue them back into their openings for a very subtle but wonderfully textured finished card!

I also found that any embellishments I was inclined to add, actually detracted, so I left it at three color coordinated enamel hearts from the Altenew Enamel Dots sets and decided it was good!
Thank you again for stopping by and have a wonderful, wonderful day! Click over to Instagram if you’re looking for the list of giveaway winners.


