
Hey, hello! Welcome back! It’s time for the July release blog hop with Altenew and I have several projects to share with you! If you’ve arrived here from Enza’s blog you’re on the right track, otherwise you can click back to the beginning at the Altenew Card blog and catch all the beautiful and inspiring projects!

My first project features the Charming Doodles stamp set. I will admit, I was drawn to this muted, earthy color scheme for all of my projects for this release, but it was only with this card that it worked and really rang my bells!

I used a variety of green inks, Olive, Moss, Frayed Leaf, Forest Glades and Evergreen, as well as Evening Gray and Moonrock from the Warm Gray color family and embossing ink with white embossing powder. I just piled on the stamped images not worrying about what was overlapping what. I laid down two strips of washi tape I don’t love anymore to mask the sentiment area and when the botanical stamping was all done I removed the tape and stamped the “thinking of you” sentiment from the Dainty Swiss Dots stamp set. I added the border lines with a black marker and straight edge.

You could make this a one layer card but I’m never brave enough to stamp directly onto a card base, so I trimmed this card panel down by 1/8th” on each side and adhered it to a white card base.

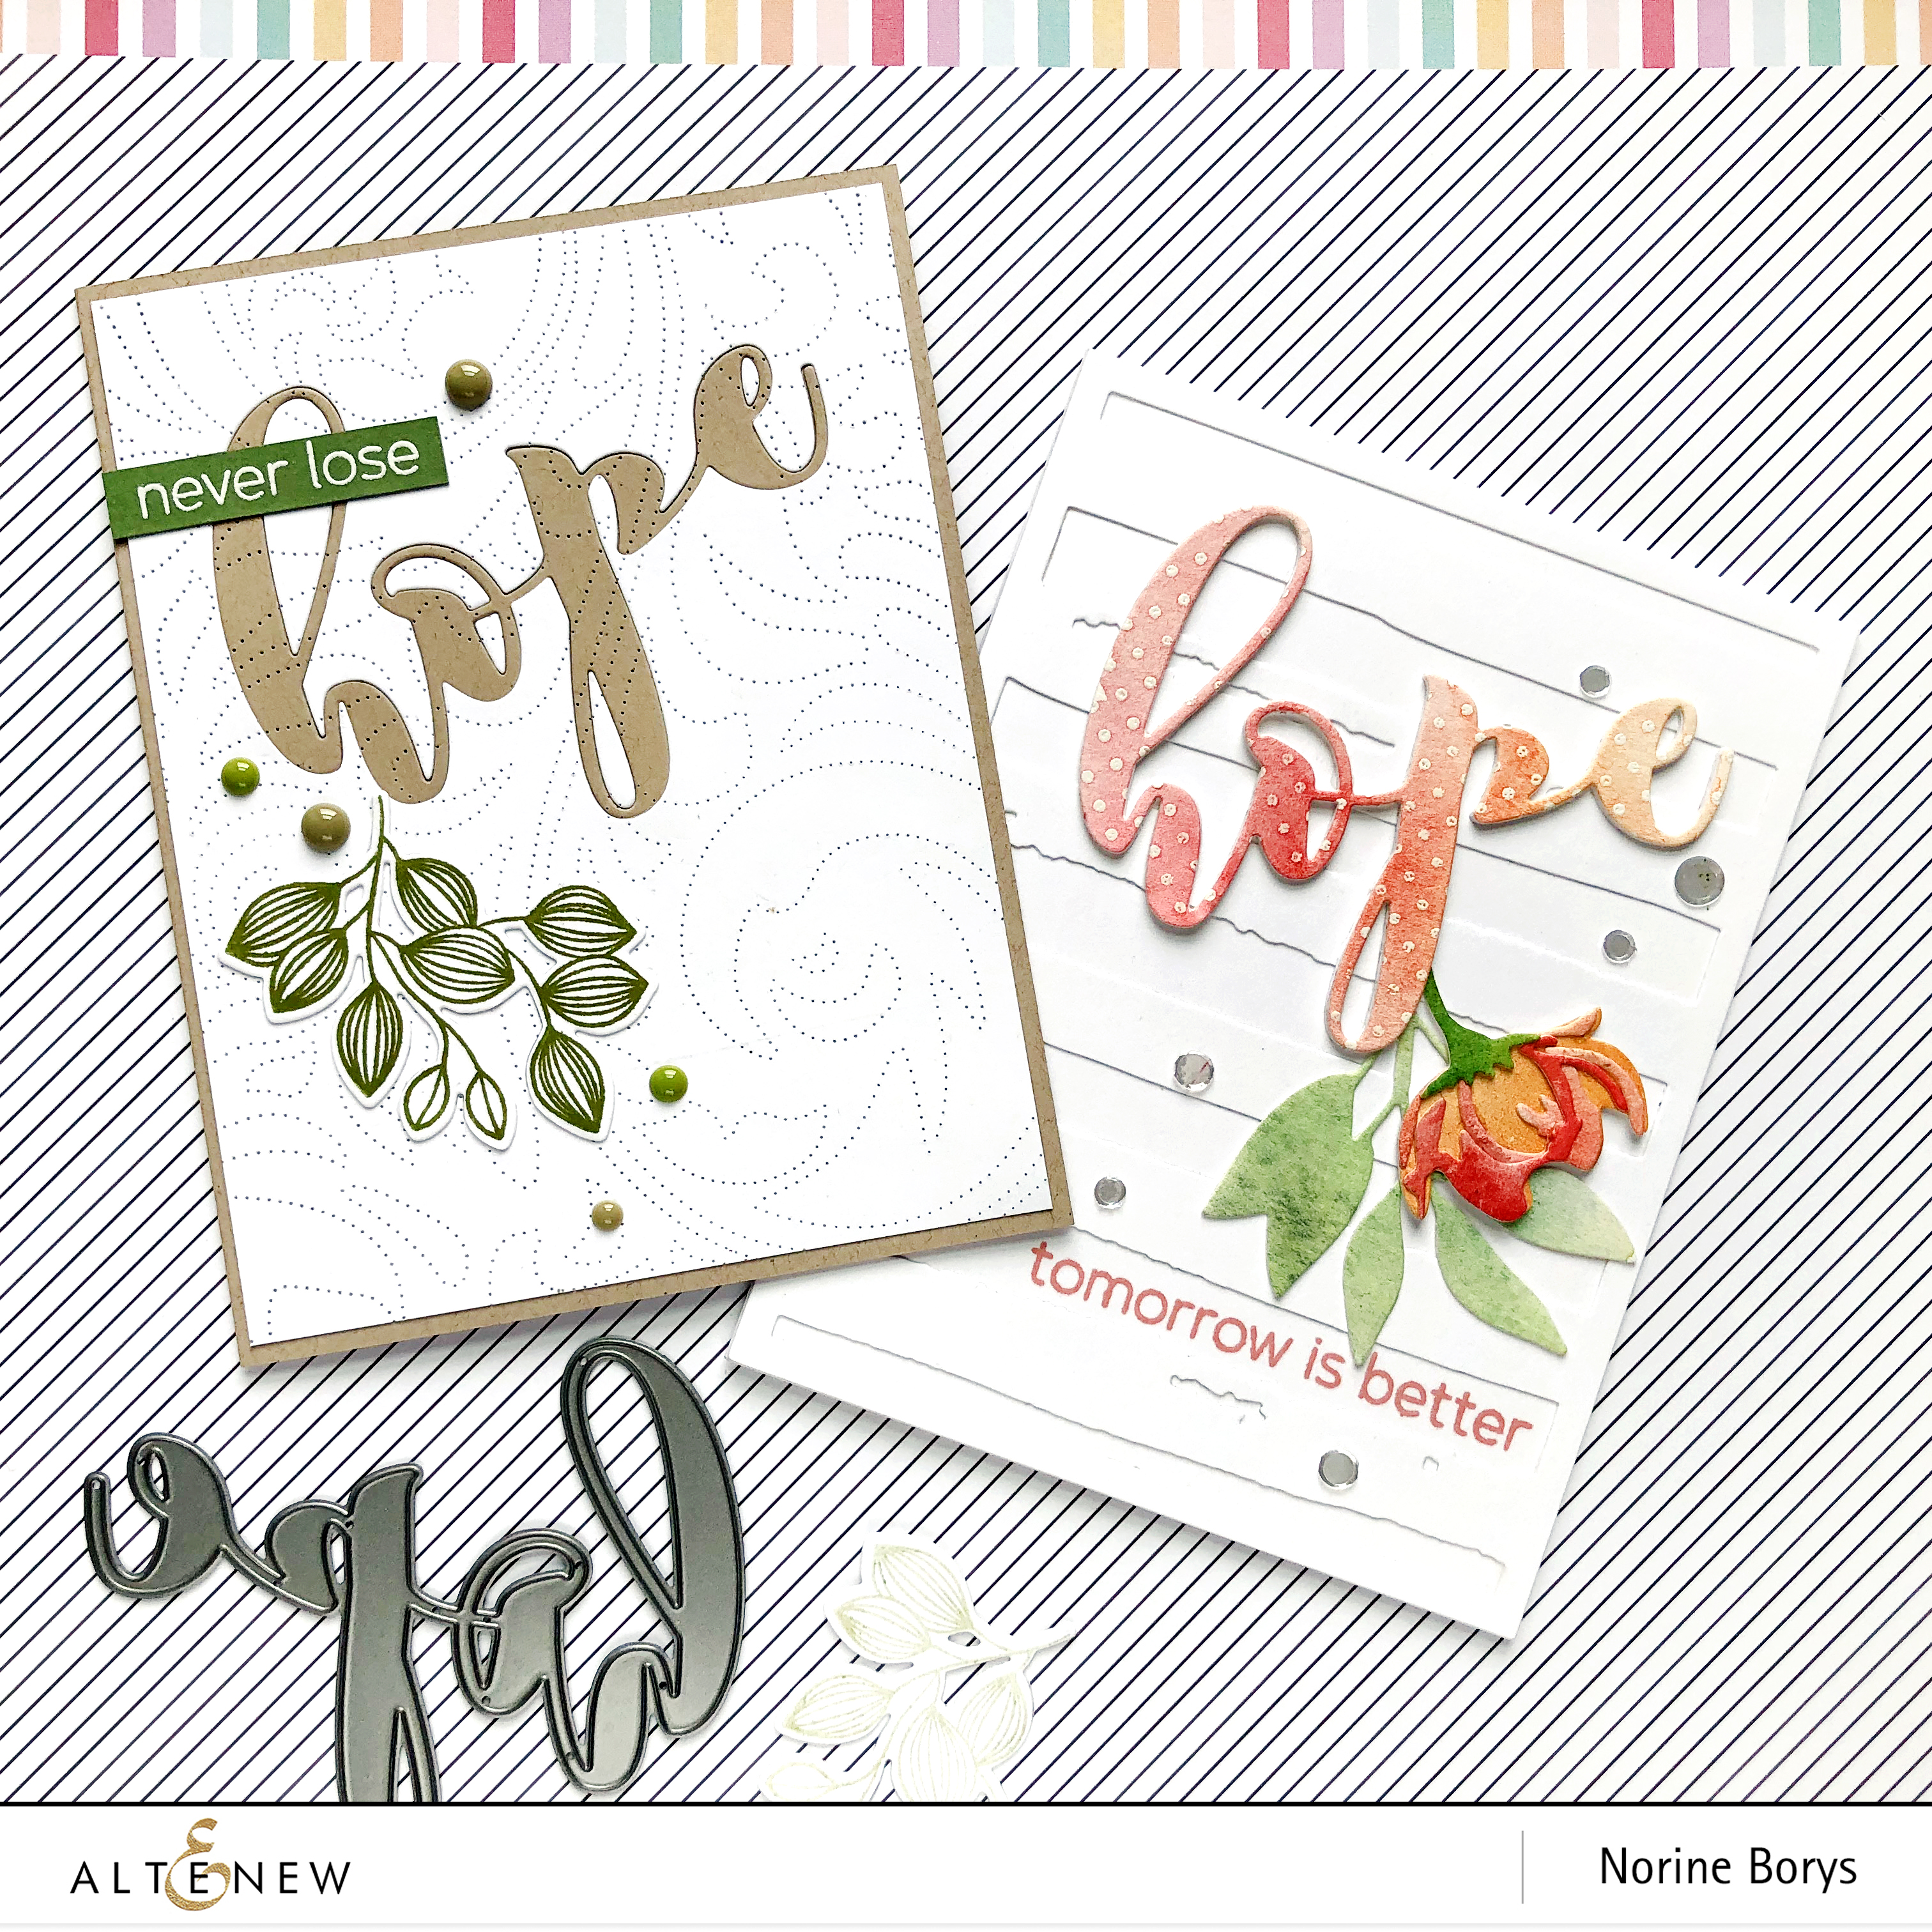
Next up are a couple of cards made using the Mega Greetings 4 stamp set and the Mega Hope die.

I stamped a sheet of watercolor paper with the Dainty Swiss Dots stamp set and heat embossed with white embossing powder before painting all over with a pink/peach/yellow blend of watercolor paints. Then I die cut the word “hope” from that along with two more layers of cardstock to stack behind. I also die cut a panel of cardstock with the Watercolor Stripes die and layered it over my card base. I stamped a sentiment from the Mega Greetings 4 stamp set in a gap left by the striped die cut panel with Rouge ink.

If you remember this release and post, I had some extra Virginia Rose leaves and blooms created from that project, and they just happened to match my watercolor painted word, so I used a couple to tuck under the stacked word die cut. Then I added a few clear flat sequins to complete the card.


For this card I ran a white cardstock panel and a kraft cardstock panel through the embossing machine with the Dotted Swirls Debossing Die. Because the die cuts at exactly an A2 card size, I could assume that the word die would cut out in the exact same position. To ensure that, I die cut first from the kraft cardstock, removed the word from the die, positioned the die cut over the white cardstock where I wanted it to cut, and drew a light pencil line inside the loop of the “h” and the “e”. Then I taped the die to the white cardstock and cut it out.

Flipping the white cardstock over onto it’s front, I applied tiny glue spots to the letter inserts that I wanted left behind, and glued then to the kraft card base with the whole sheet intact. Next, I removed the white die cut word from the white background and replaced it with the kraft word. Finally, I covered the back of the white background cardstock with adhesive and glued it to the card base aligning it around the word. I stamped and white heat embossed a sentiment from the Mega Greetings 4 stamp set onto dark green cardstock and adhered it, and a stamped leaf die cut from the Weekend Doodles stamp set to the card front. Then a few coordinating enamel dots to finish.


Lastly, I have a couple of cards that were evoking a bit of a “Christmas in July” vibe for me! The Sophisticated Wreath stamp and die set has some lovely berries and blooms but I got fixated on the “ferny” image that reminds me of a pine bough! I challenge you to unsee it!

I used most of the same greens as I used above on the Charming Doodles card, and repeatedly stamped the branch and miniature leaves onto white cardstock. Then I ink-blended some additional coordinating shades onto the background.

Next, I stamped one of the sentiments from the Sophisticated Wreath stamp set with the newly released black ink (love this ink!!) then used a deckle-edge rectangle die to die cut the mini card panel. I matted it with some white card stock, backed it with a layer of fun foam and tied some gold twine around to the front, and adhered the mini card panel over the original opening left in the larger card panel. Finally, I adhered the whole to a white cardstock card base. At first I found the frayed threads of the twine to be sort of vexing, but then I trimmed them on an angle like they are, and then I loved it!


For the 2nd Sophisticated Wreath card, I die cut an oval shape from some scrap cardstock and used three different shades of green markers to draw on a white cardstock A2 sized card panel, around the oval, shifting the cardstock each time to adjust the pen outlines. Using that as a guide, I stamped the leafy branch over top with Moss and Evergreen inks. I stamped the leaf sprigs, the berry cluster and the miniature blooms with green ink and gold ink, then die-cut each one.

I adhered each of the die cuts to the card front, stamped and heat embossed the sentiment with the Antique Gold ink, then smeared some of the same gold ink onto an acrylic stamping block and diluted it with a little water in a brush before splattering the gold ink onto the card front. It’s hard to capture the gleam of the gold ink on the mini blooms and the splatters, but in real life it’s very pretty!

Before we finish up, I have one more thing to share with you! Along with these stamp and die sets and many more, Altenew is also releasing a silicone stamping mat. This silicone grid mat is great for stamping, watercolor, ink blending, heat embossing, and everyday crafting! The mat features inches as well as metric measurements on the edges and a half inch grid. Due to the nature of the silicone surface, some grid lines have slight imperfections and are not completely straight. This will not affect the quality or functionality of the mat.
- Material: Silicone
- Color: White
- Size: 12″x16″
- Surface: One side printed with grid, one side non-slip
- Heat Resistant
Whew, that was a lot, huh??! Thank you for sticking with me to this point! Now about the giveaways!
To celebrate this release, Altenew is giving away a $50 gift certificate to 6 lucky winners! Please leave a comment on the Altenew Card Blog and/or Altenew Scrapbook Blog by 7/16/2019 for a chance to win.
We’ll also draw a winner to receive a $20 gift certificate from the comments left on each designer’s blog on the blog hop list below. All winners will be announced on the Altenew blogs on 7/16/2019.
Your next stop on the hop is the Altenew Scrapbook Blog! I love to see these products used in such a variety of ways and I know you won’t be disappointed over there! Below is the complete blog hop list in case you find yourself lost along the way!
Norine Borys – You Are Here
Altenew Scrapbook Blog – Next stop!