Hi, hello! I’m back today and joining The Greetery for a blog hop to showcase the new release, called Man Made, going live in the shop tomorrow! I hear so many of you in the comments, that you love to be inspired by masculine cards, so I’m pretty sure this release and hop will make you very happy! You are likely arriving here from Kelly’s blog, but if not, just click back to the beginning at The Greetery blog so you don’t miss anything good!
Here are the products being released on Tuesday, May 25th @ 10am EDT
- Dad Squared stamp and die
- Sentiments Squared stamp and die
- Text Box die
- Tartan Builder Stencil
- Tartan Builder Diagonal Stencil
- Dad Jokes: Nailed It stamp and die
- Big Plans background
- Dad Jokes: High Steaks stamp and die
- Reflections stamp and die
This post contains affiliate links that are listed below. By clicking through to purchase products linked, you are helping to support this blog at no additional cost to you and that allows me to continue to provide you with creative inspiration and instructive help.
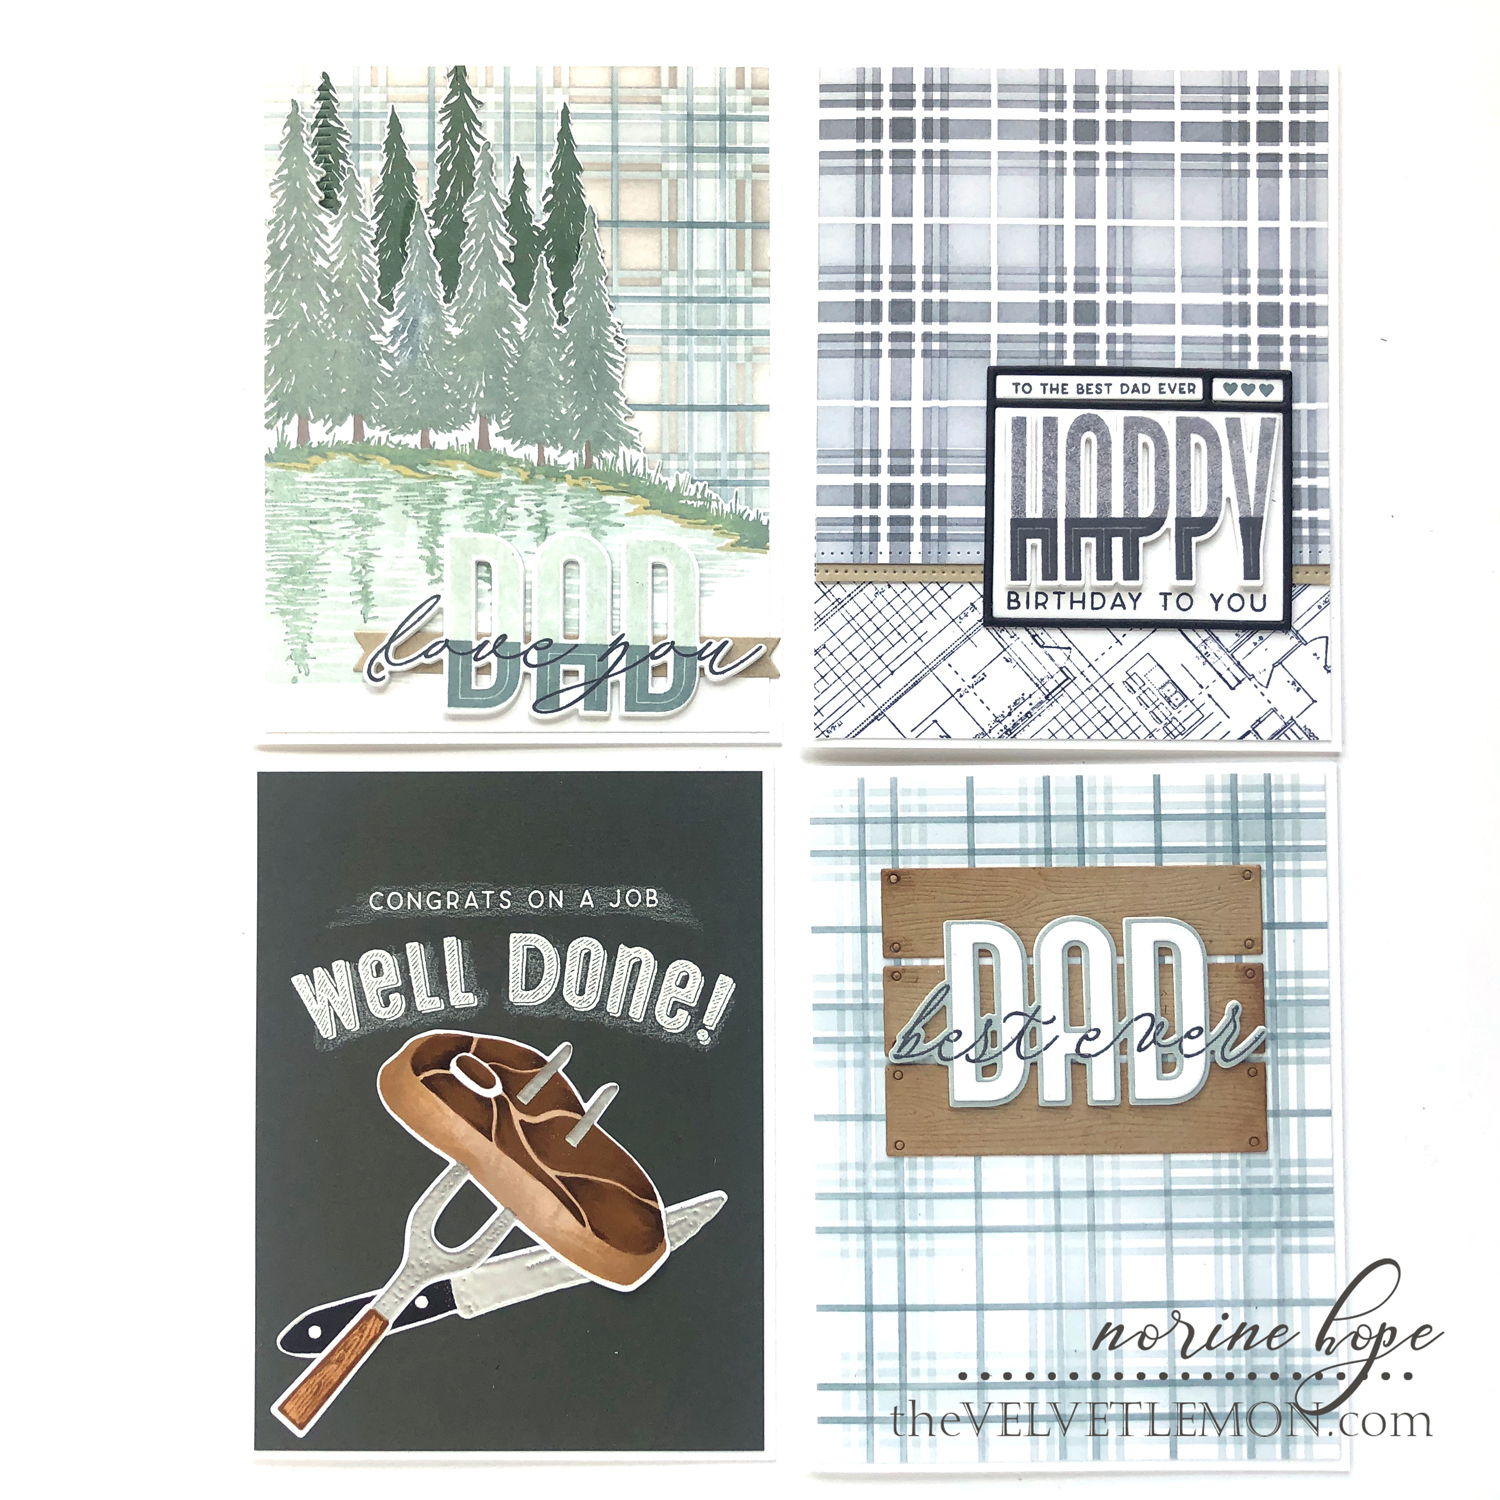
I have a few cards to share today, featuring a number of different products in this release from The Greetery! Stencils! Stamps! Dies! And not a flower or bow anywhere!
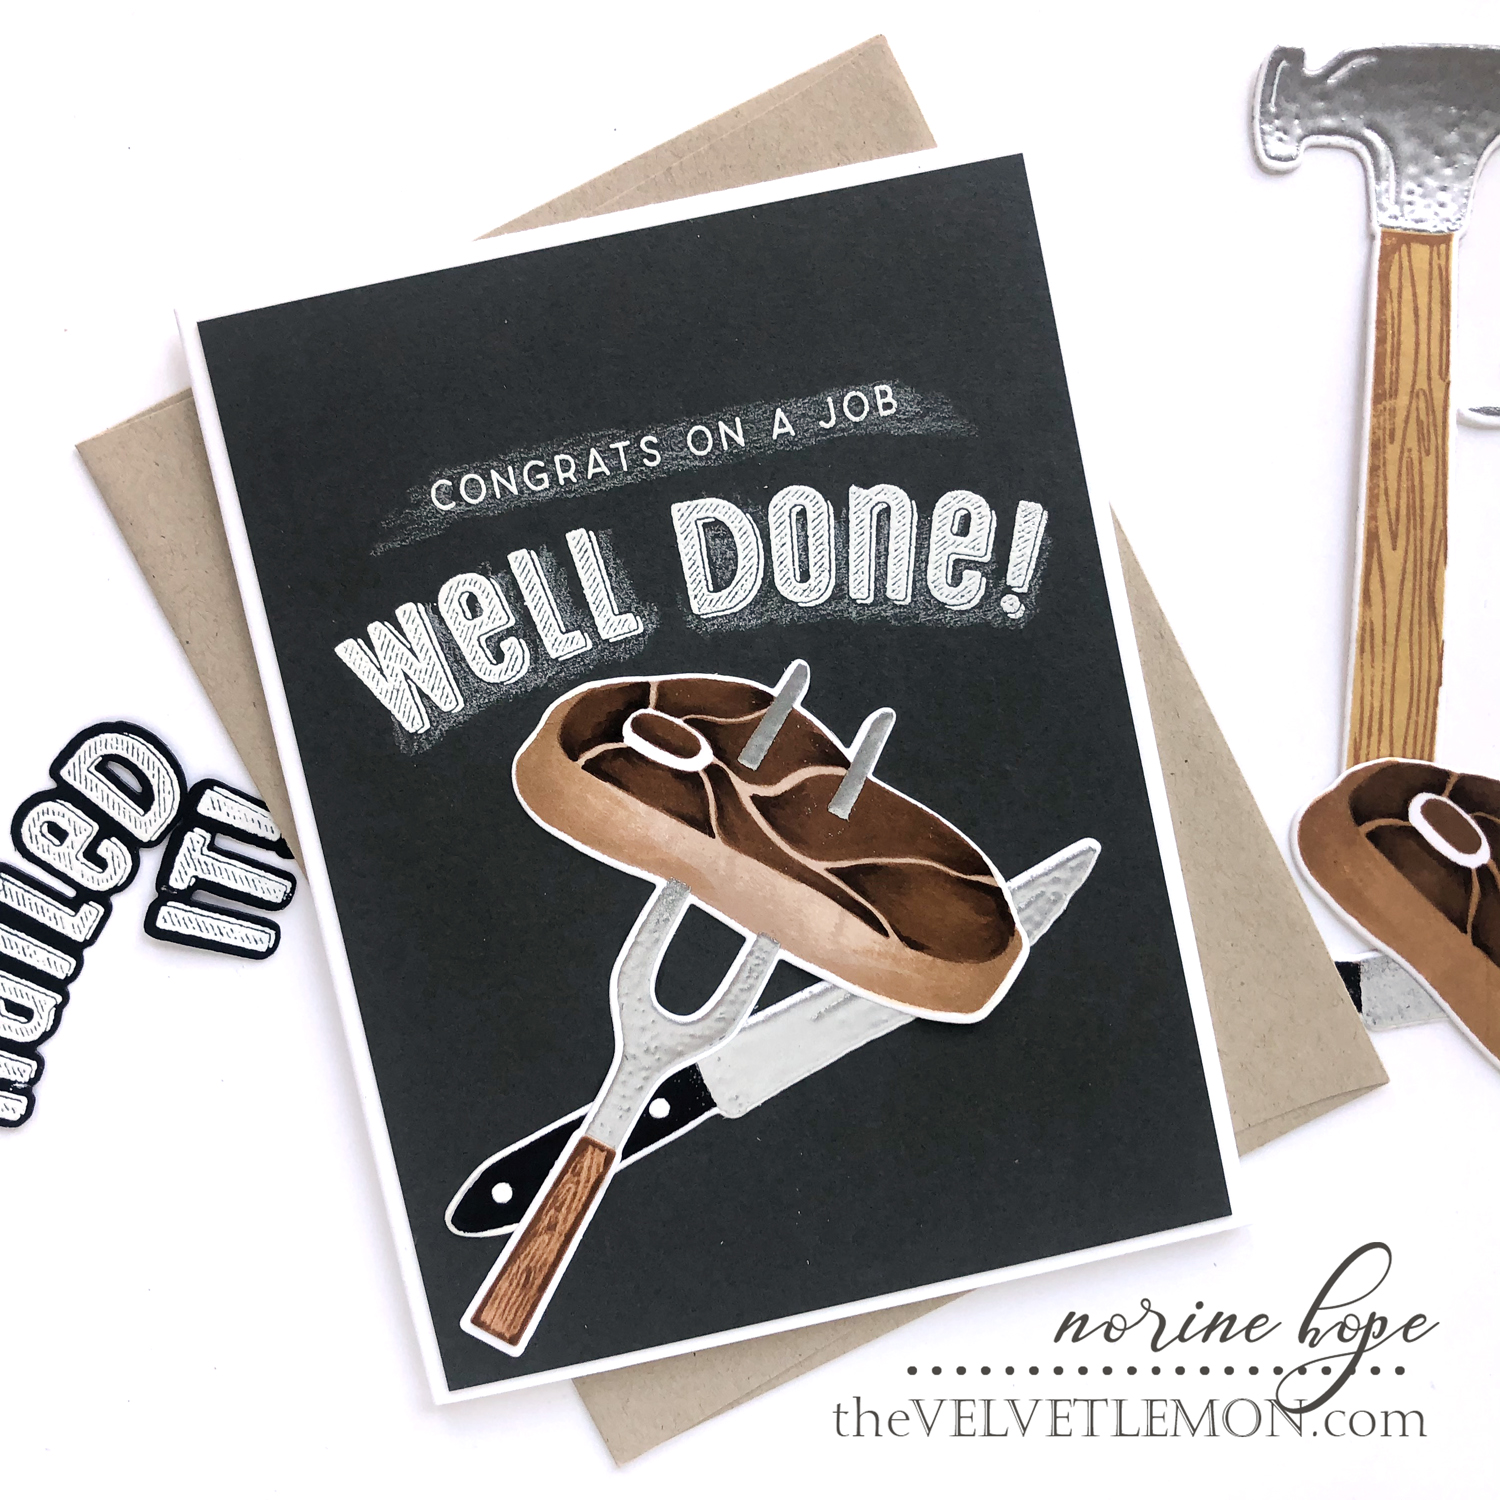
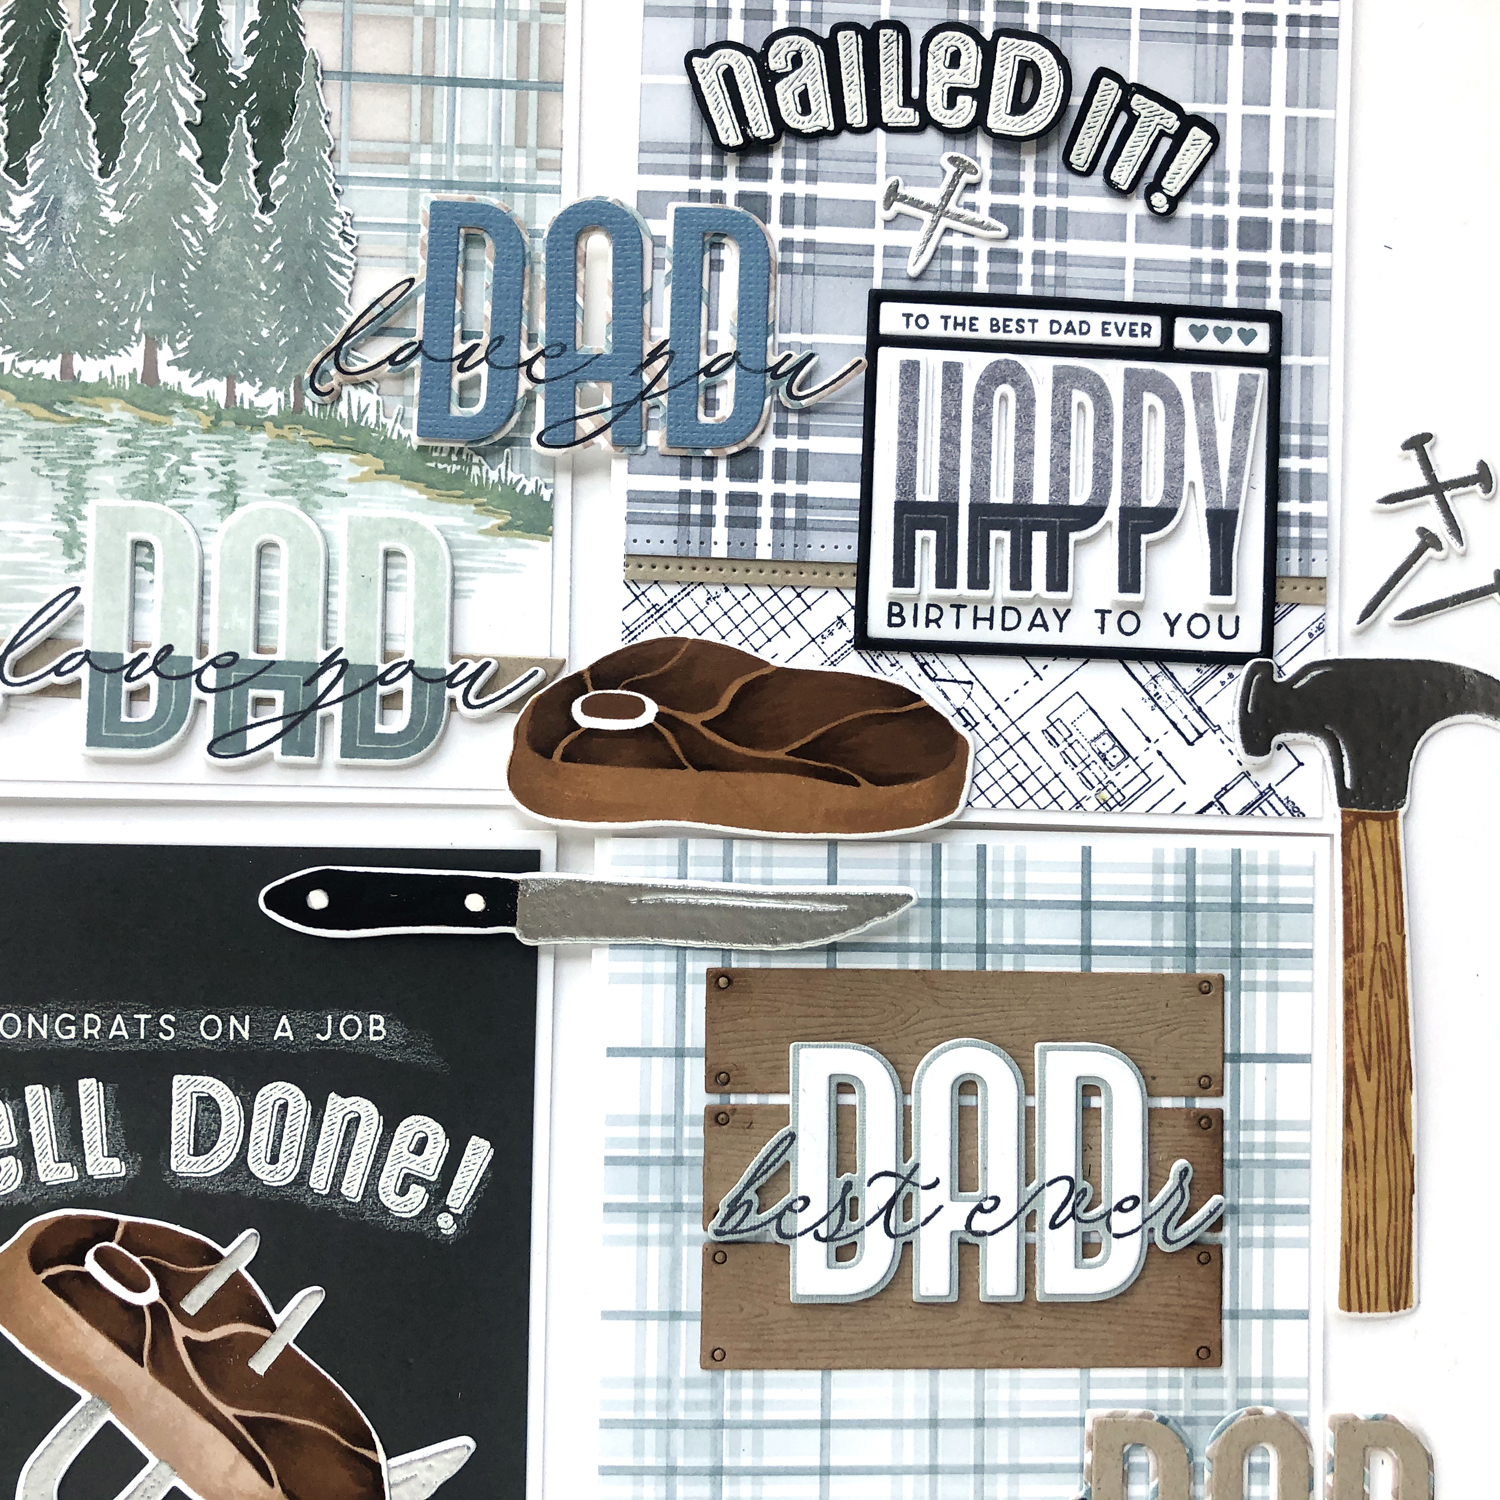
For my first card, I wanted to treat it like a chalkboard card – somehow the font of the sentiment stamp inspired that idea! I stamped the steak and fork from the Dad Jokes: High Steaks stamp and die set in colors of ink that would suggest a “well done” piece of meat, and heat embossed the business ends of the fork and knife with silver embossing powder.
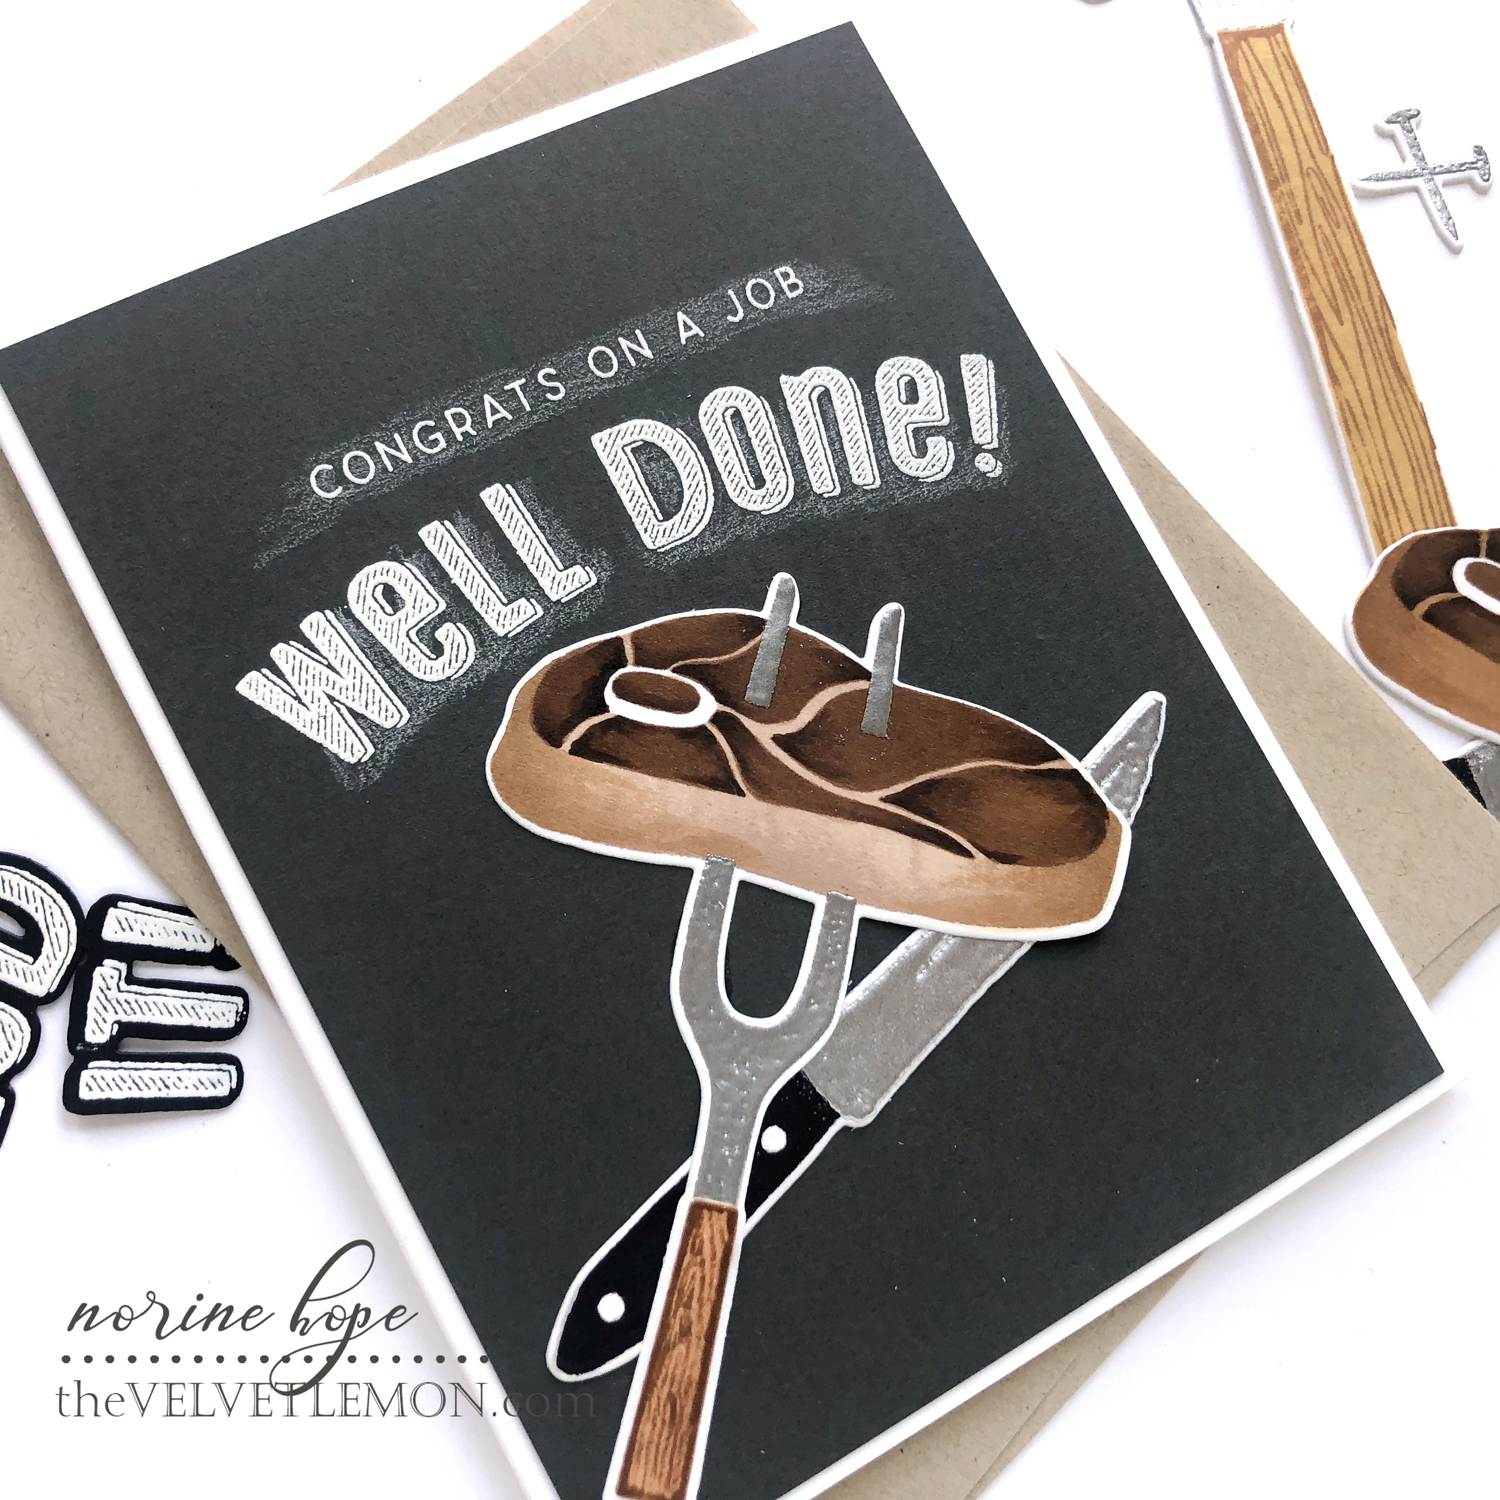
I die cut the stamped pieces, then added some shading to the meat with Copic markers. I stamped the greeting stamps (just one of MANY to choose from!) onto charcoal cardstock and heat set with white embossing powder. Then I used a white pencil crayon to add “chalk dust” behind the sentiments for a little extra authenticity.
Next up is a card that show cases one of the fantastic plaid building stencils. There are two – a straight-up one – Tartan Builder -as you see here, and a diagonal one – Tartan Builder Diagonal. I did ink blend some diagonal plaids, but ended up using just the straight ones! They consist of 5 stencils that you can layer is any order you like!
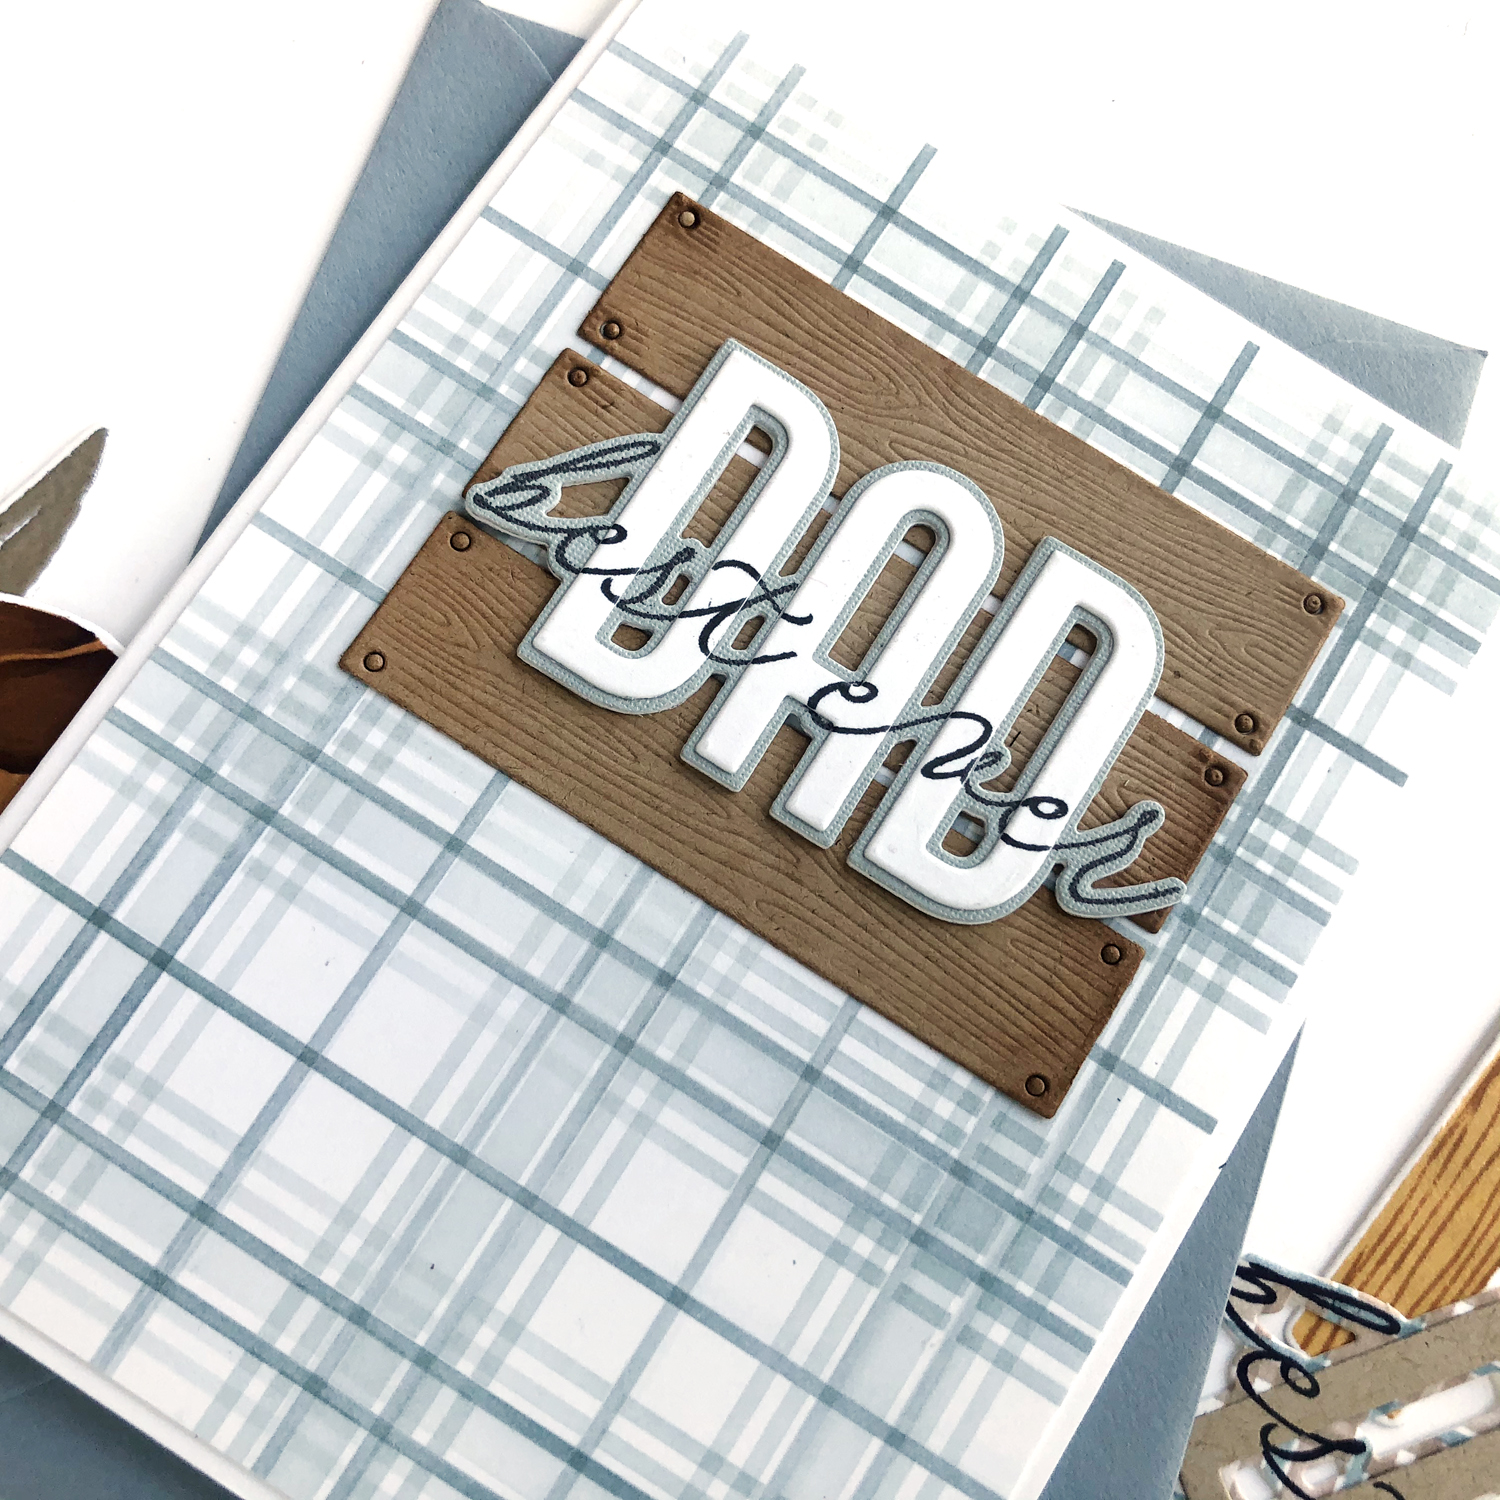
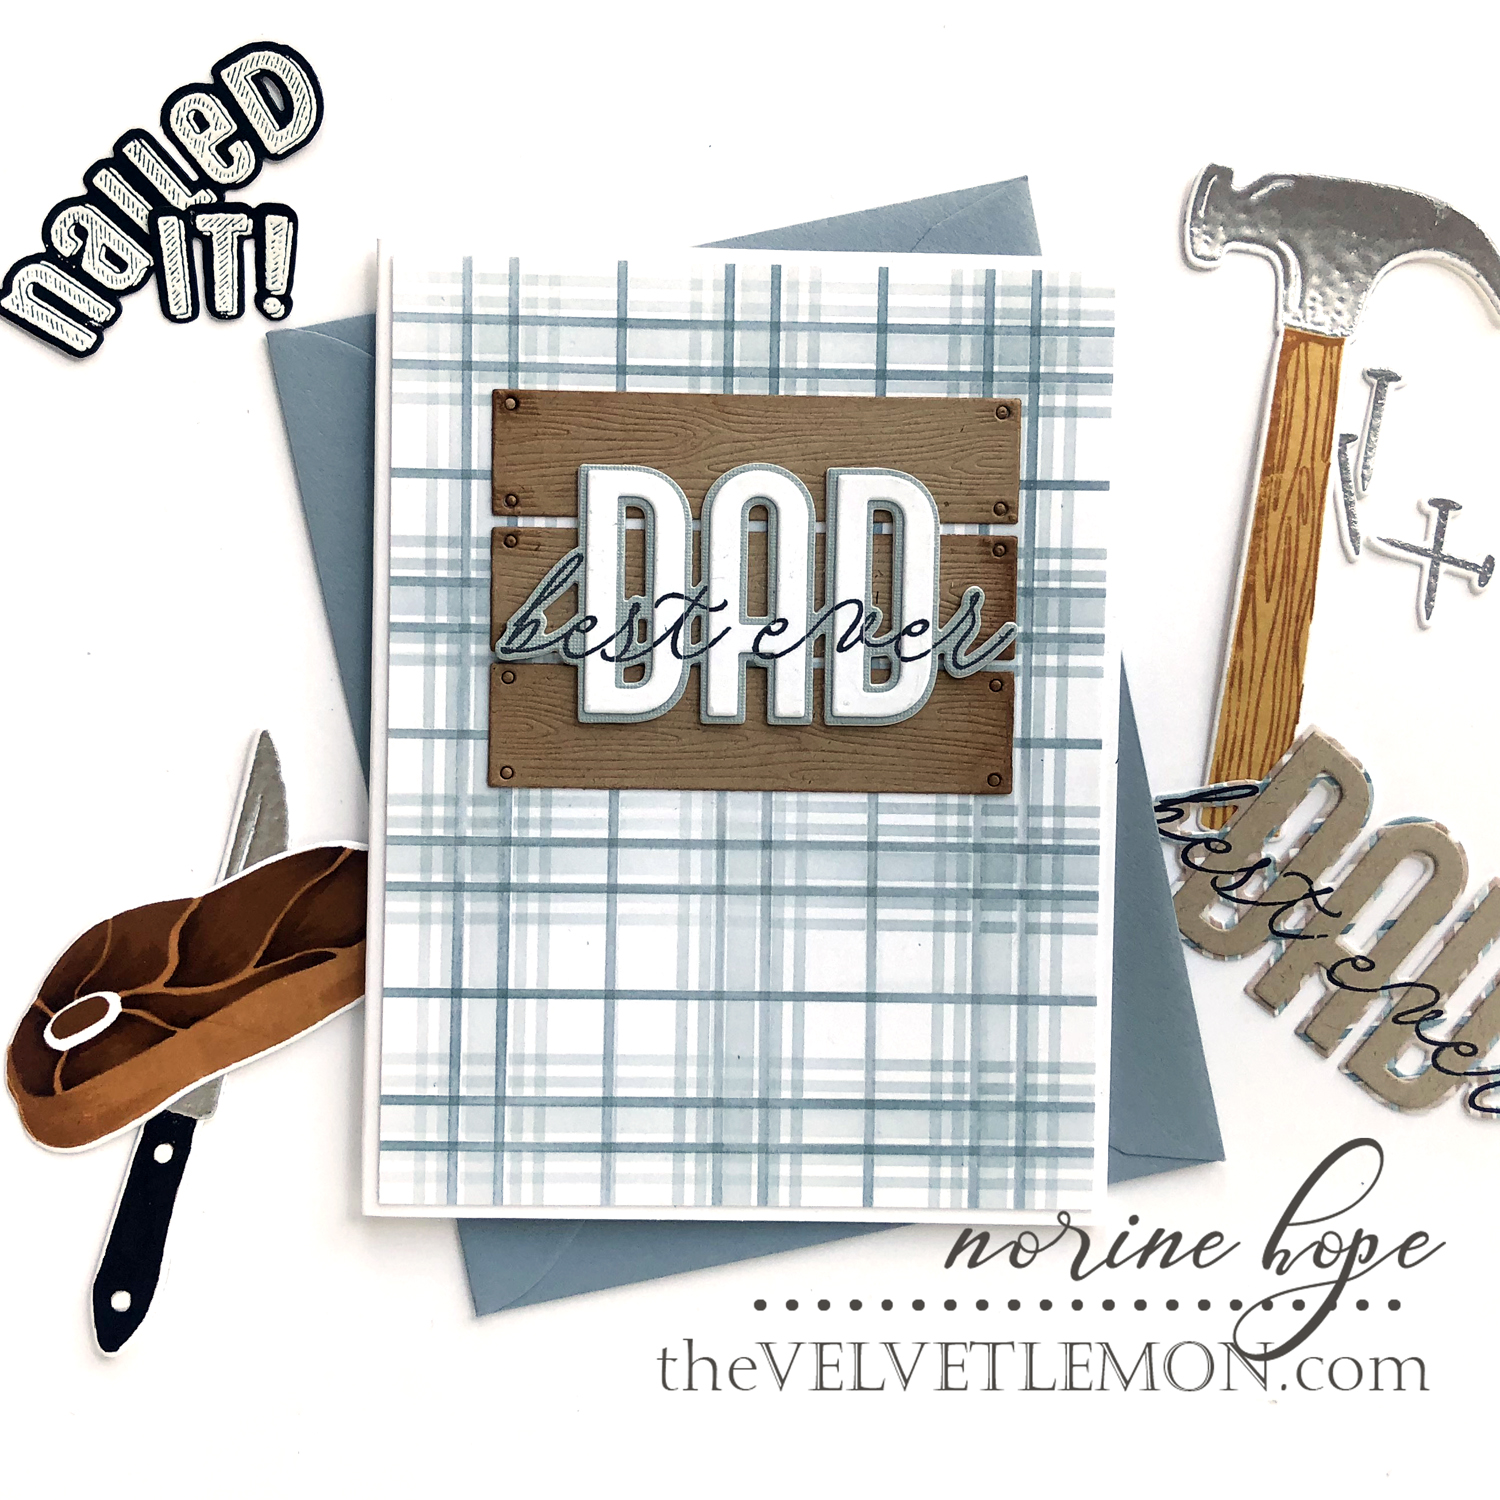
Isn’t that die cut and stamped greeting incredible!? The Dad Squared stamp and dies offer two sentiment choices for stamping words across the die cut – Best Dad Ever and Love You Dad. (Really hope we’ll see more of this style).
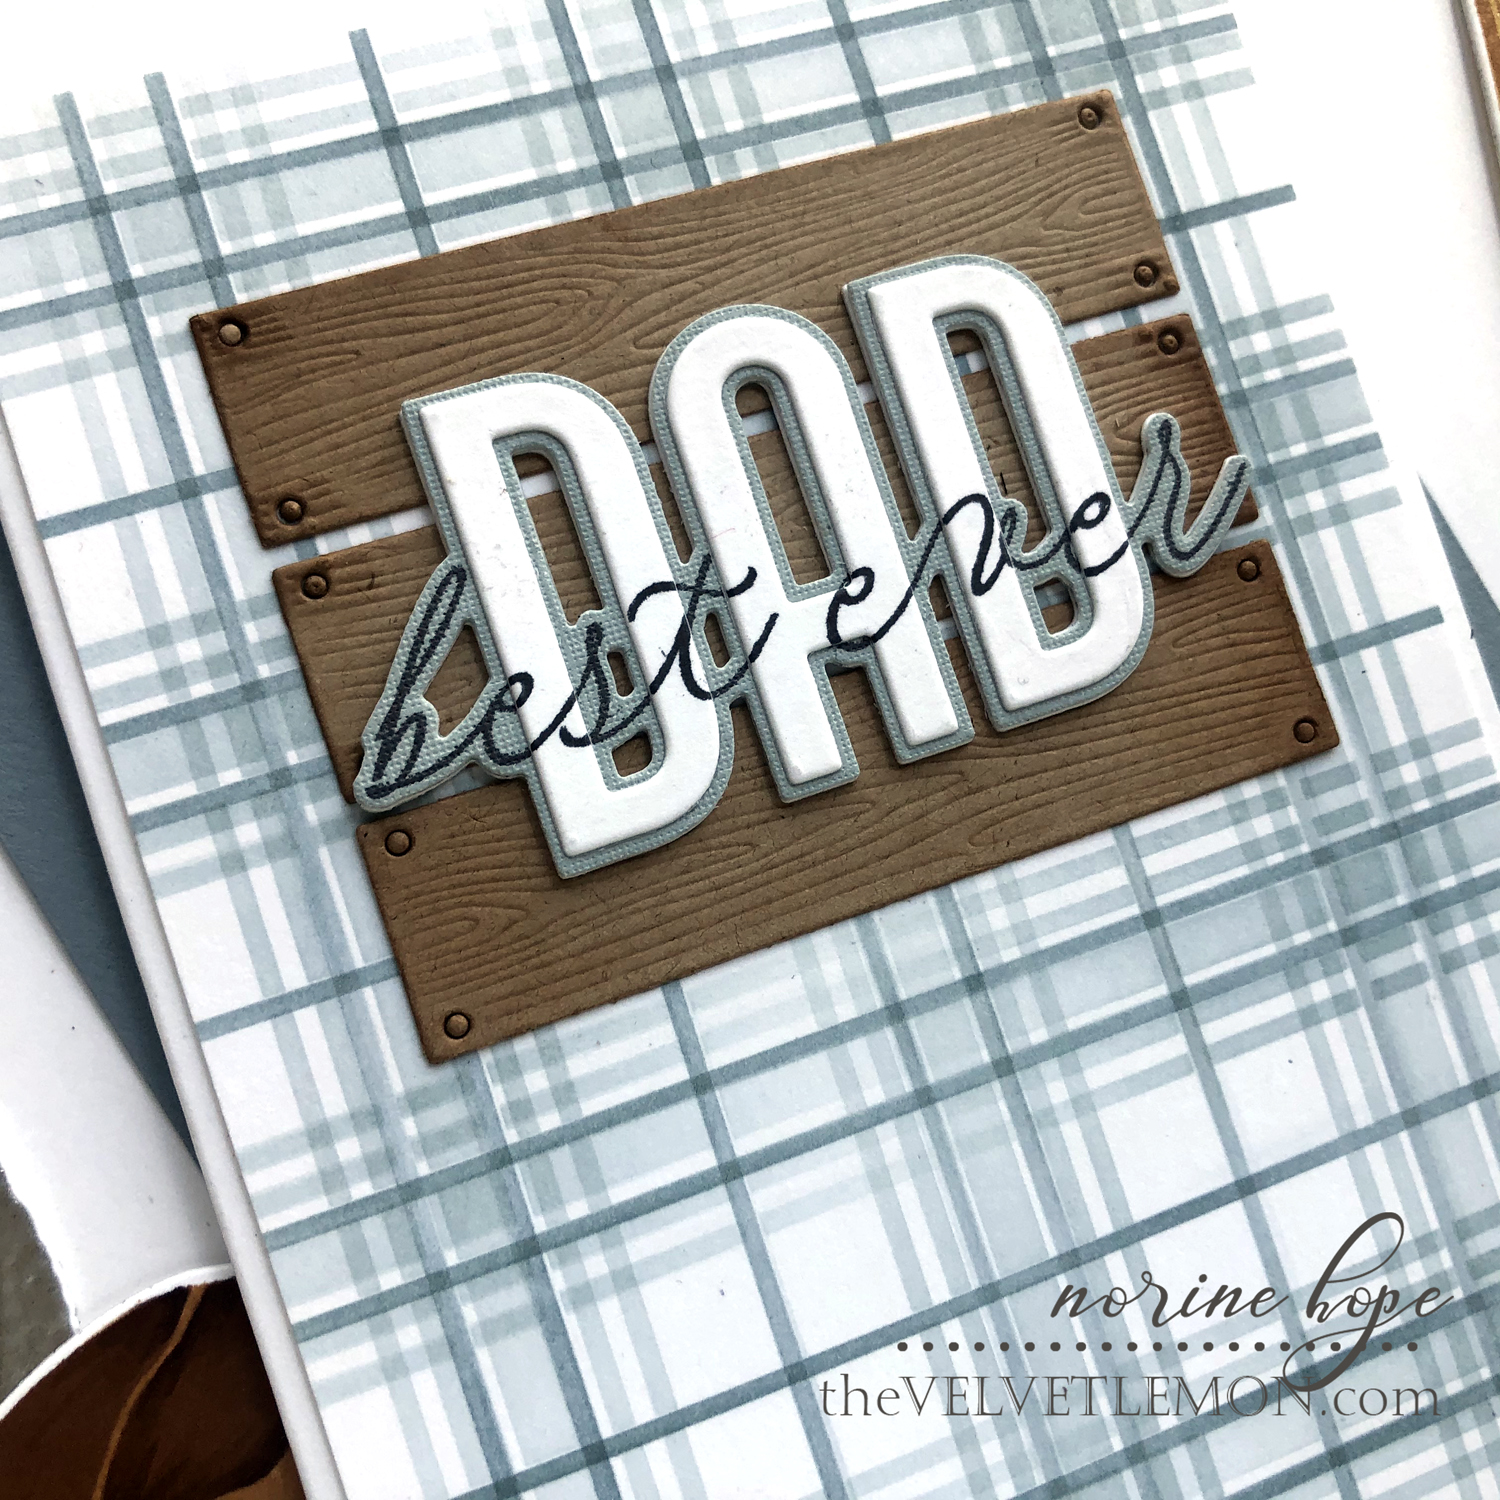
I die cut the bottom layer of the sentiment first, from blue/grey cardstock, left the die cut in it’s opening and stamped the phrase across the bottom layer. Then I temporarily adhered the white cardstock die cut letters over top of the background silhouette layer and stamped again, still in the MISTI. I adhered the letters permanently (an extra step not entirely necessary – permanently gluing the first time around would be just fine) then layered them overtop of three die cut and ink blended planks from the Shiplap Builder Die set (back in stock soon).
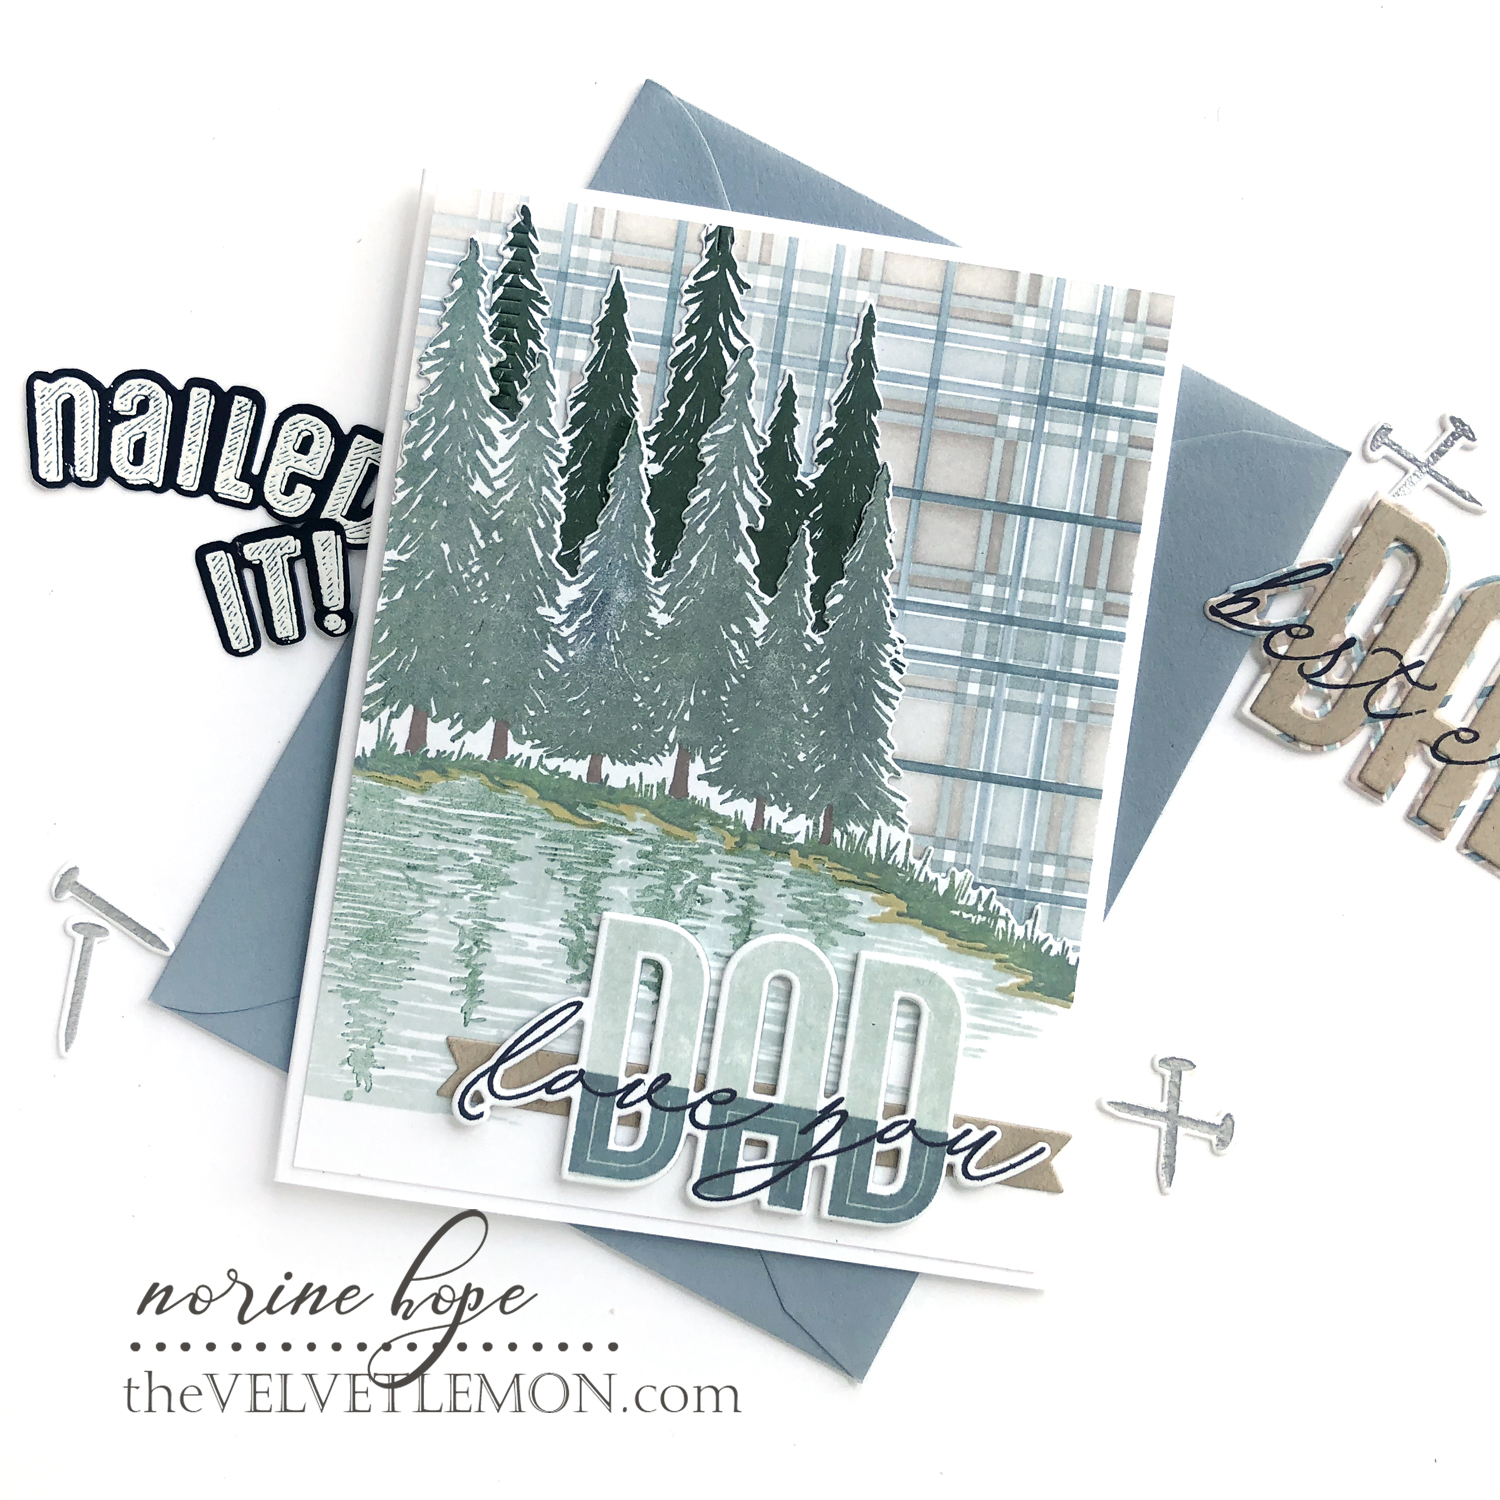
Card #3 is a mix of layered stamping, stenciled plaid, and another die cut sentiment. I stamped the shoreline with water reflections using the Reflections stamp set then die cut the top edge. I repeated stamping the trees with darker ink, then die cut and tucked the shadow-ier trees in the background.
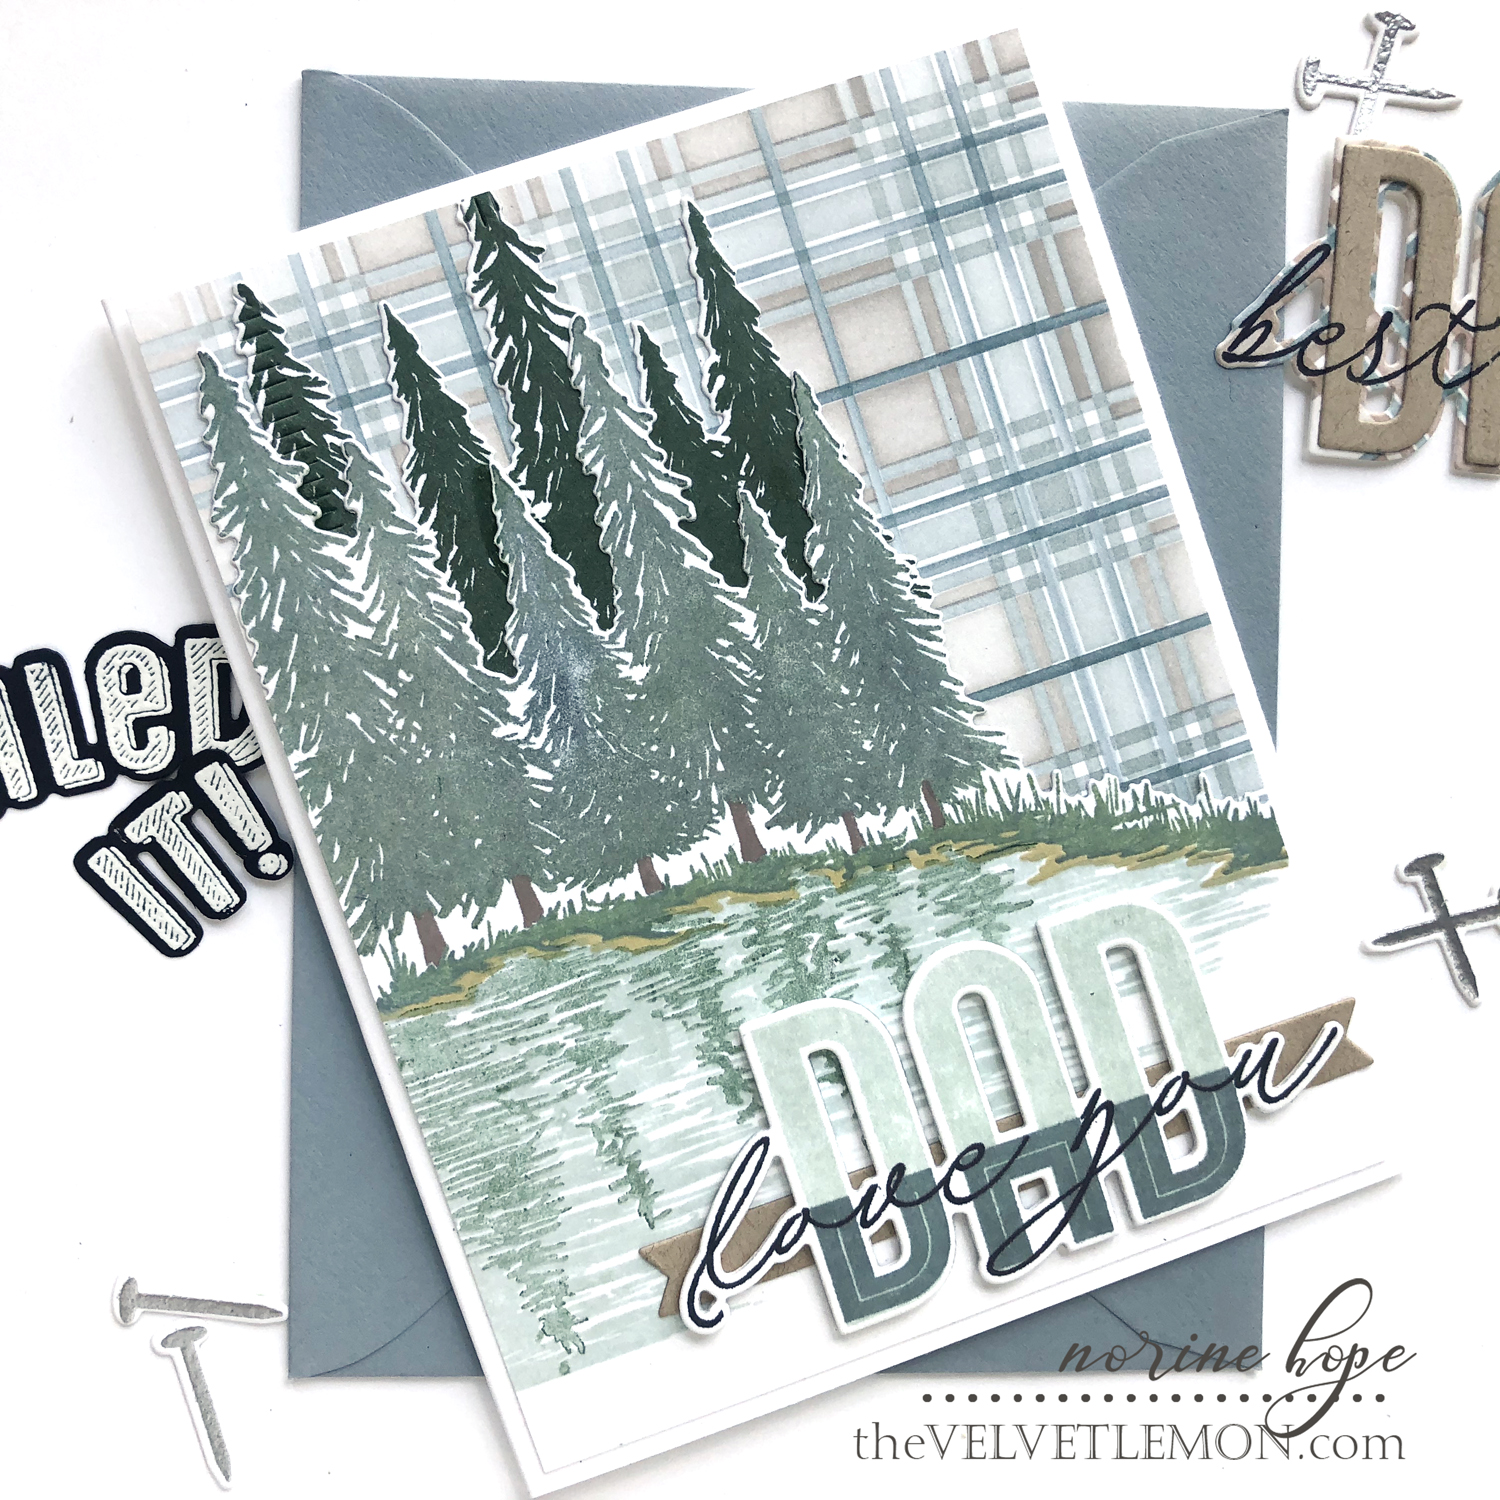
I die cut the sentiment first then stamped the layered portions of the DAD letters then added the “love you” stamp. I find the lining up of stamps to be easier on an already die-cut shape. I die cut several more layers and glued them together for extra bulk. Then I layered the shoreline scene overtop of some coordinating plaid and added the greeting over top a kraft cardstock banner die cut from the PreText Sentiments die set.
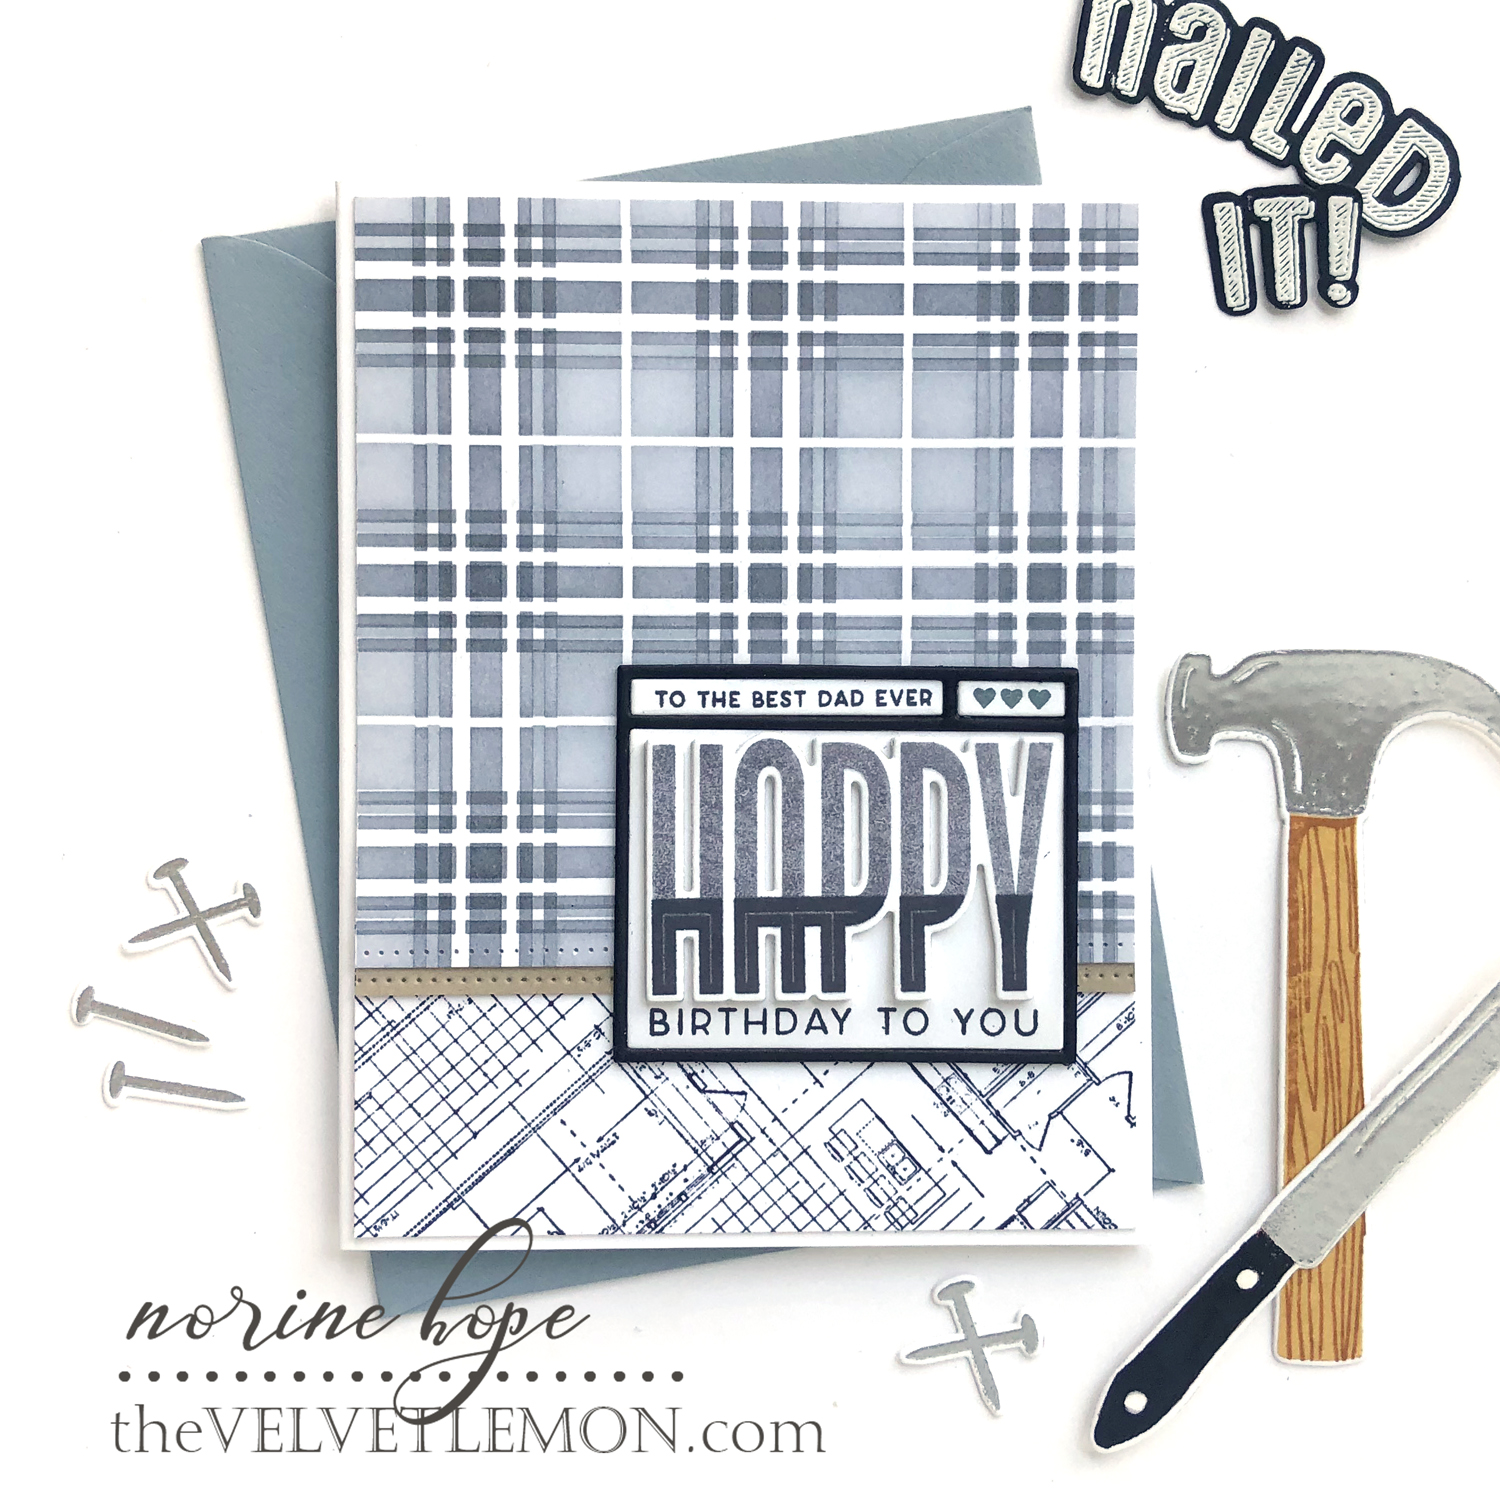
My last card features the background red-rubber stamp called Big Plans, paired with more…you guessed it….plaid!
Side note. I have a particular fondness for plaid. My own Dad wore a lot of plaid shirts in his life. Short sleeves in summer, long sleeved flannel in winter. With a balled up kleenex in the chest pocket. After he passed, I turned several of his favorite shirts into pillows for us kids and his grandkids. Complete with balled up kleenex in the handy pocket. You can check that out here.
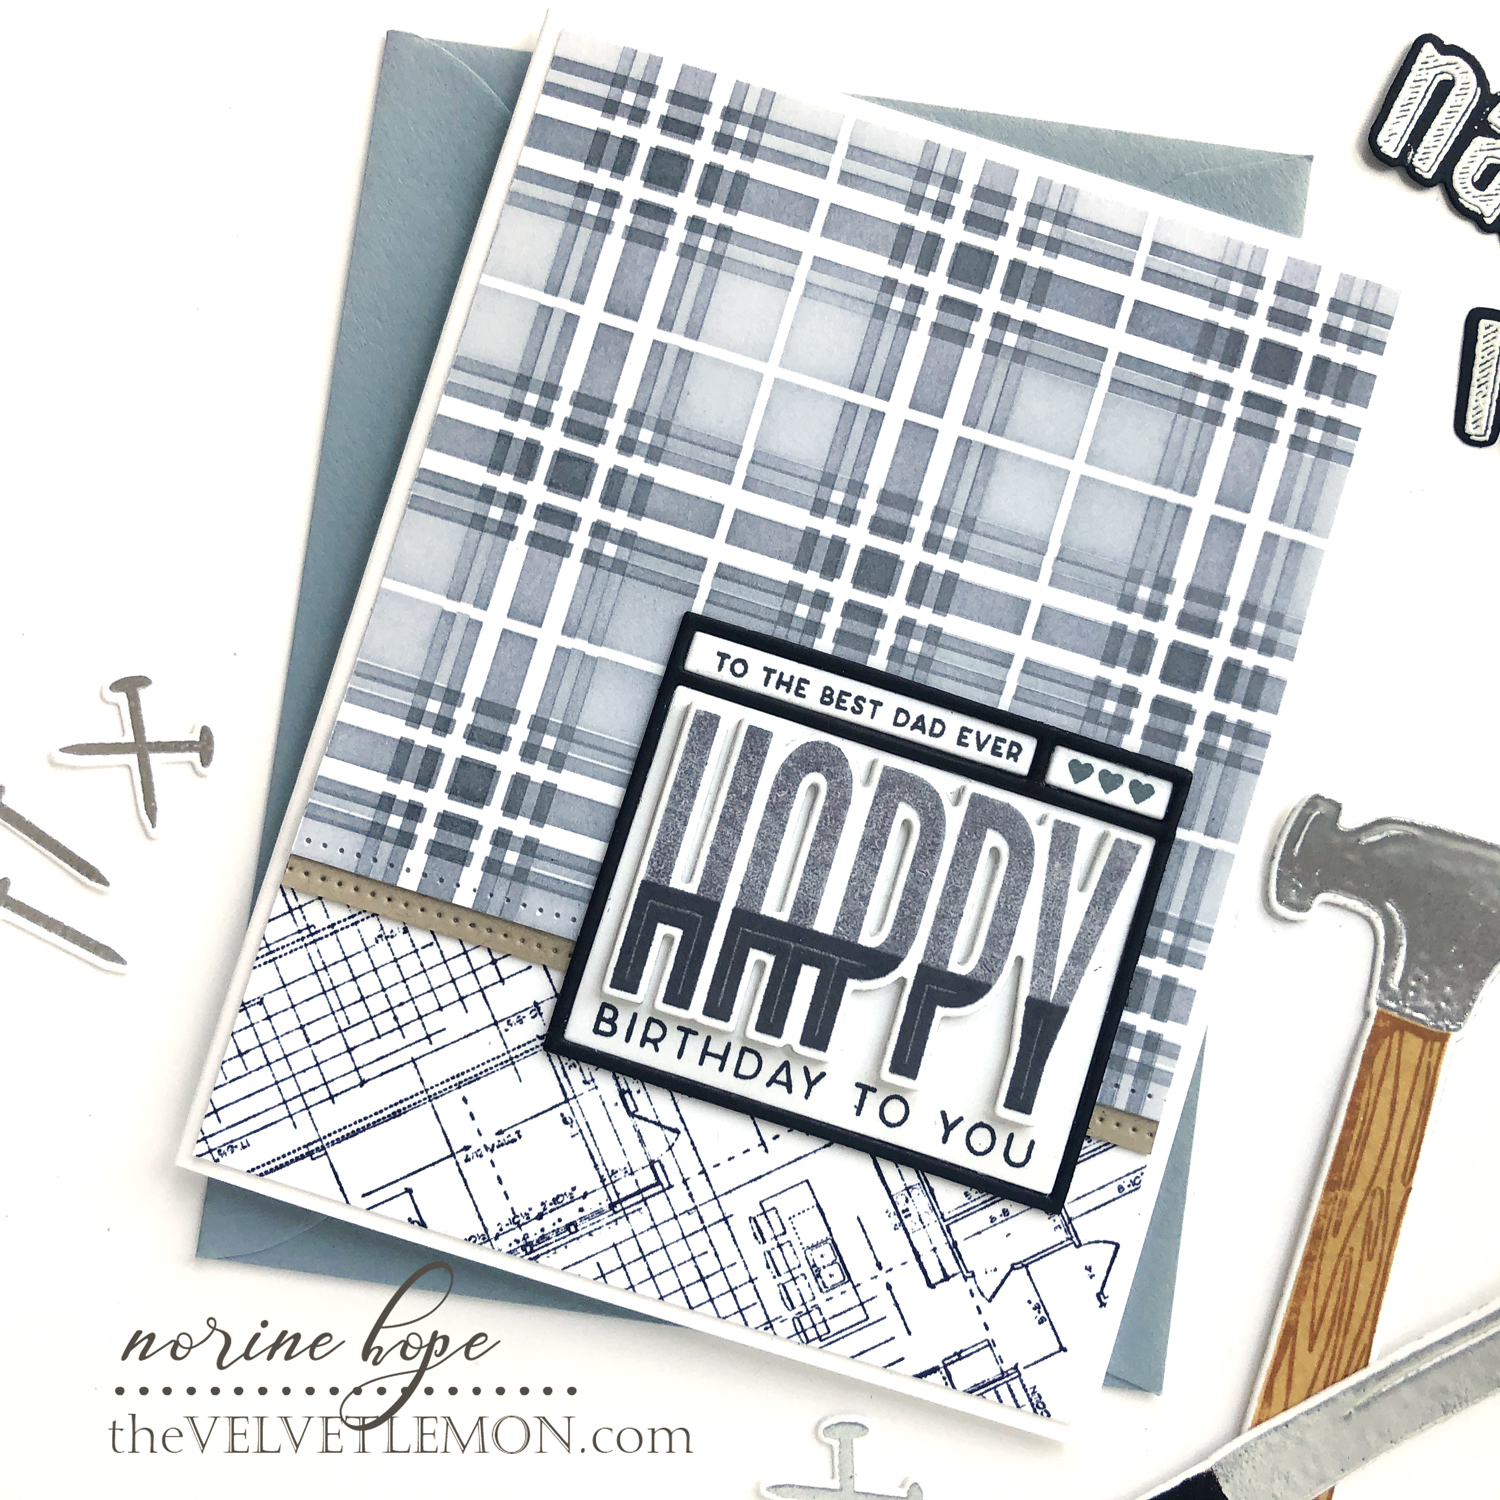
I stamped a layered greeting from the Sentiments Squared stamp set and die cut the box frame around it. I added additional greetings from the set – again, so many to choose from!
I added a kraft cardstock trim that I die cut with the straight edge of the Halfsies Oval Die to get the dotted lines.
The hammer, nails and “nailed it” sentiment are from the Dad Jokes: Nailed It stamp and die set, which I didn’t use on any cards today, but wanted you to see how great they are!
Whew, that’s a lot! Your next and last stop on the hop is Wanda’s blog! Refer to the complete list below in case of any broken links. And don’t forget to leave a comment – prizes are involved! TWO #50 gift cards are up for grabs from comments left on The Greetery blog and each of the designer blogs below.
Blog Hop Order:
- Laurie Willison
- Dawn McVey
- Heather Nichols
- Keeway Tsao
- Angelica Conrad
- Kelly Lunceford
- Norine Borys
- Wanda Guess
Thanks for stopping by and enjoy the rest of the hop!
SUPPLIES USED: