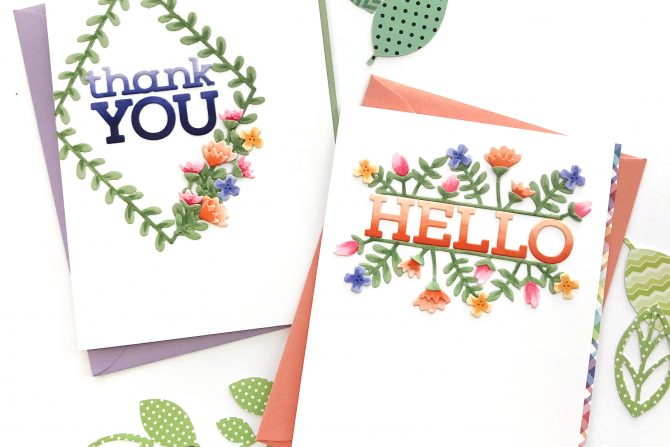
Hi, hello! I’m back today with a couple of cards to show you the very cute dies for the September 2020 Die of the Month Kit called Hello & Thank You!

The kit dies include besides the letters to spell out “thank you” and “hello”, a selection of vine and floral dies to create a parallelogram (had to ask someone what that was called again) frame.

I began by die cutting all of the leaves and ivy from green cardstock, and the flower shapes and letters from white cardstock. I used Press ‘N’ Seal to keep all the die cut pieces in place in the cardstock to make them easier to color with Copic markers.

For the orange color gradation on the “hello” letters I used YR09, YR07, YR02, YR01, YR00. I used those colors as well for some of the layered flowers and I used G94, G46 and G40 to add some shadow definition to the greenery, both on the vines and the leaves.

Instead of using the floral frame intact though, I cut it at the corners and used the two longest sides to frame the “hello” above and below, saving the leaf stems from the short sides of the frame to build the bouquet on the second card below. I finished the card by trimming off a very narrow edge of the front panel of the folded card base and gluing a strip of patterned paper to the edge of the back fold so that it is visible from the front.

I followed the same steps for die cutting and coloring the floral frame for the second card.

The Copic colors I used for the rest of the flowers include RV29, RV25, RV23, and RV21 for the tulip-styled blooms, Y38 and Y32 for the yellow flowers, BV08, BV04, BV02 and BV01 for the purple flowers and the “thank you” die cuts.

I really love the simplicity of the second vine frame, so I used it unaltered, adhered it to a folded card base and used it to frame the die cut greeting. I used the leftover leaf parts of the frame from the first card to make an arrangement of colored flowers and stems into a bouquet on the vine frame and adhered them with liquid adhesive. I did the same trick as above, trimming the front fold slightly smaller on the right hand side so that a strip of green cardstock glued to the edge of the back side of the card can show through to the front.
If you like this kind of versatility in a die kit, you might like to check out the Spellbinders subscription page, where you will find this one (the Small Die of the Month) and many other Value Clubs to choose from!
Thank you for stopping by and have a wonderful day!


