Hi, hello! Have you seen the Simon Says Stamp Crafty Hugs Release that just rolled out? It’s another wonderful collection of thoughtfully created and curated designs, perfect especially for right now when many of us are sending out appreciation and encouragement cards! In particular, there’s a Crafty Stamp Set I have my eye on…!

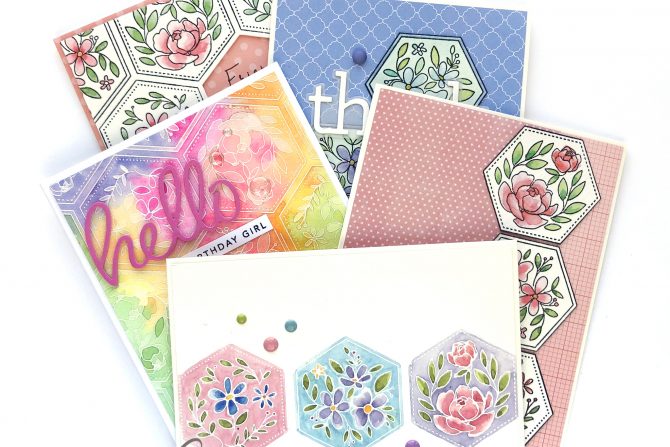
Today though, I’m sharing several cards I made using the red rubber background stamp called Center Cut Hexagon Floral. It’s beautiful. I can’t tell you how much I enjoyed playing with it. And there is a separate sentiment stamp set and hexagon die that coordinate with this background set that will be very useful to have as well!

The very first thing I did was to stamp the entire image onto some watercolor paper and paint/blend a rainbow-esque background of color. I tried to be careful where the various colors ran into other color – that it wouldn’t produce muddy blends.

I picked some bright pink cardstock to match one of the colors in the painted panel and die cut the smaller of the two “hello”s in the CZDesign Hellos die set. I cut another layer from dark pink fun foam and adhered the two together. The “birthday girl” sentiment is stamped from the Hello You stamp set, also by CZDesigns. I covered the pink cardstock greeting with some clear Wink of Stella, which is hard to pick up on in the photos. Then a few clear enamel dots complete the card.

Next, I stamped the all-over stamp design with Versafine Onyx Black ink onto watercolor paper and heat set with clear embossing powder. This time though, I removed the center hexagon stamp and left the opening bare. I watercolor painted all the leaves and flowers very simply, leaving the background natural and unpainted. The overall look reminds me of a quilt Aunt Betty had on her guest bed when I was little. I don’t actually have an Aunt Betty, but you know what I mean.


Not having the coordinating hexagon die, I just used a straight edge and sharp craft knife to cut out the opening in the middle. I stamped a sentiment from the Spring Gnomes stamp set onto a subtle patterned paper, choosing one that would compliment without competing. I trimmed the watercolor card panel by 1/8th” on all sides and popped it up with foam tape on the back for some dimension and interest.
I made a matching card with the same steps and techniques, stamping the all-over image onto a piece of watercolor cardstock, but this time painting only three of the hexagons and cutting them out by hand. There are three different patterns in the whole design so I chose one of each to stack up in a vertical group on my card.

I chose two more subtle, coordinating but not competing patterned papers from my stash and covered a card base with them. I paired them in unequal proportions for a more dynamic look. I stamped the greeting from the Concord and 9th Simply Said stamp set with Versafine Onyx Black ink and heat set with clear embossing powder. Then I finished the card with a few matching enamel dots.

For this next card I got a little fiddly and fussy, actually masking the stamp (where you cover the part of the image that you don’t want to stamp with Post-It paper, inking up, removing the masking paper and stamping) to only stamp the middle row of three complete hexagons. It’s an effective look, but it certainly would be easier to stamp a whole design and just cut out the specific hexies you like and want to use, and glue them onto a card front.

I watercolor painted each image, even filling in the background with color. I stamped the sentiment from the Spring Gnomes stamp set, choosing the “spring greetings” theme because the floral motif is so compatible! I trimmed the card panel short so I could add a coordinating piece of patterned paper and machine sew them together. An assortment of enamel dots complete the card.

For the last card, I popped the center hexagon out of the background design and stamped it several times onto watercolor paper using Versafine Onyx Black ink and heat setting with clear embossing powder. I chose muted shades of blues, greens and lavender to paint them and found a lovely matching patterned paper to support and unify the shades.

While the hexagon die would certainly be a simpler way to cut out the shapes, fortunately they are not hard to cut by hand. I die cut a single layer of watercolor paper for the “thank you” sentiment and backed it with vellum paper die cut with the silhouette shape of the same set. The Thank You dies are more CZDesigns. I used some fun matte embellishing dots from my stash to complete the card.
Thanks so much for stopping by today! I hope I’ve been able to help you see some of the varied ways you can use this background stamp! Have a wonderful day!


