
Hello friends! Thank you for joining me for the Altenew July release blog hop! You should have arrived here from the blog of Enza Gudor, but if not, you can simply click on to the Altenew Card Blog link and start back at the beginning so you don’t miss any of the beautiful inspiration from this month’s release!
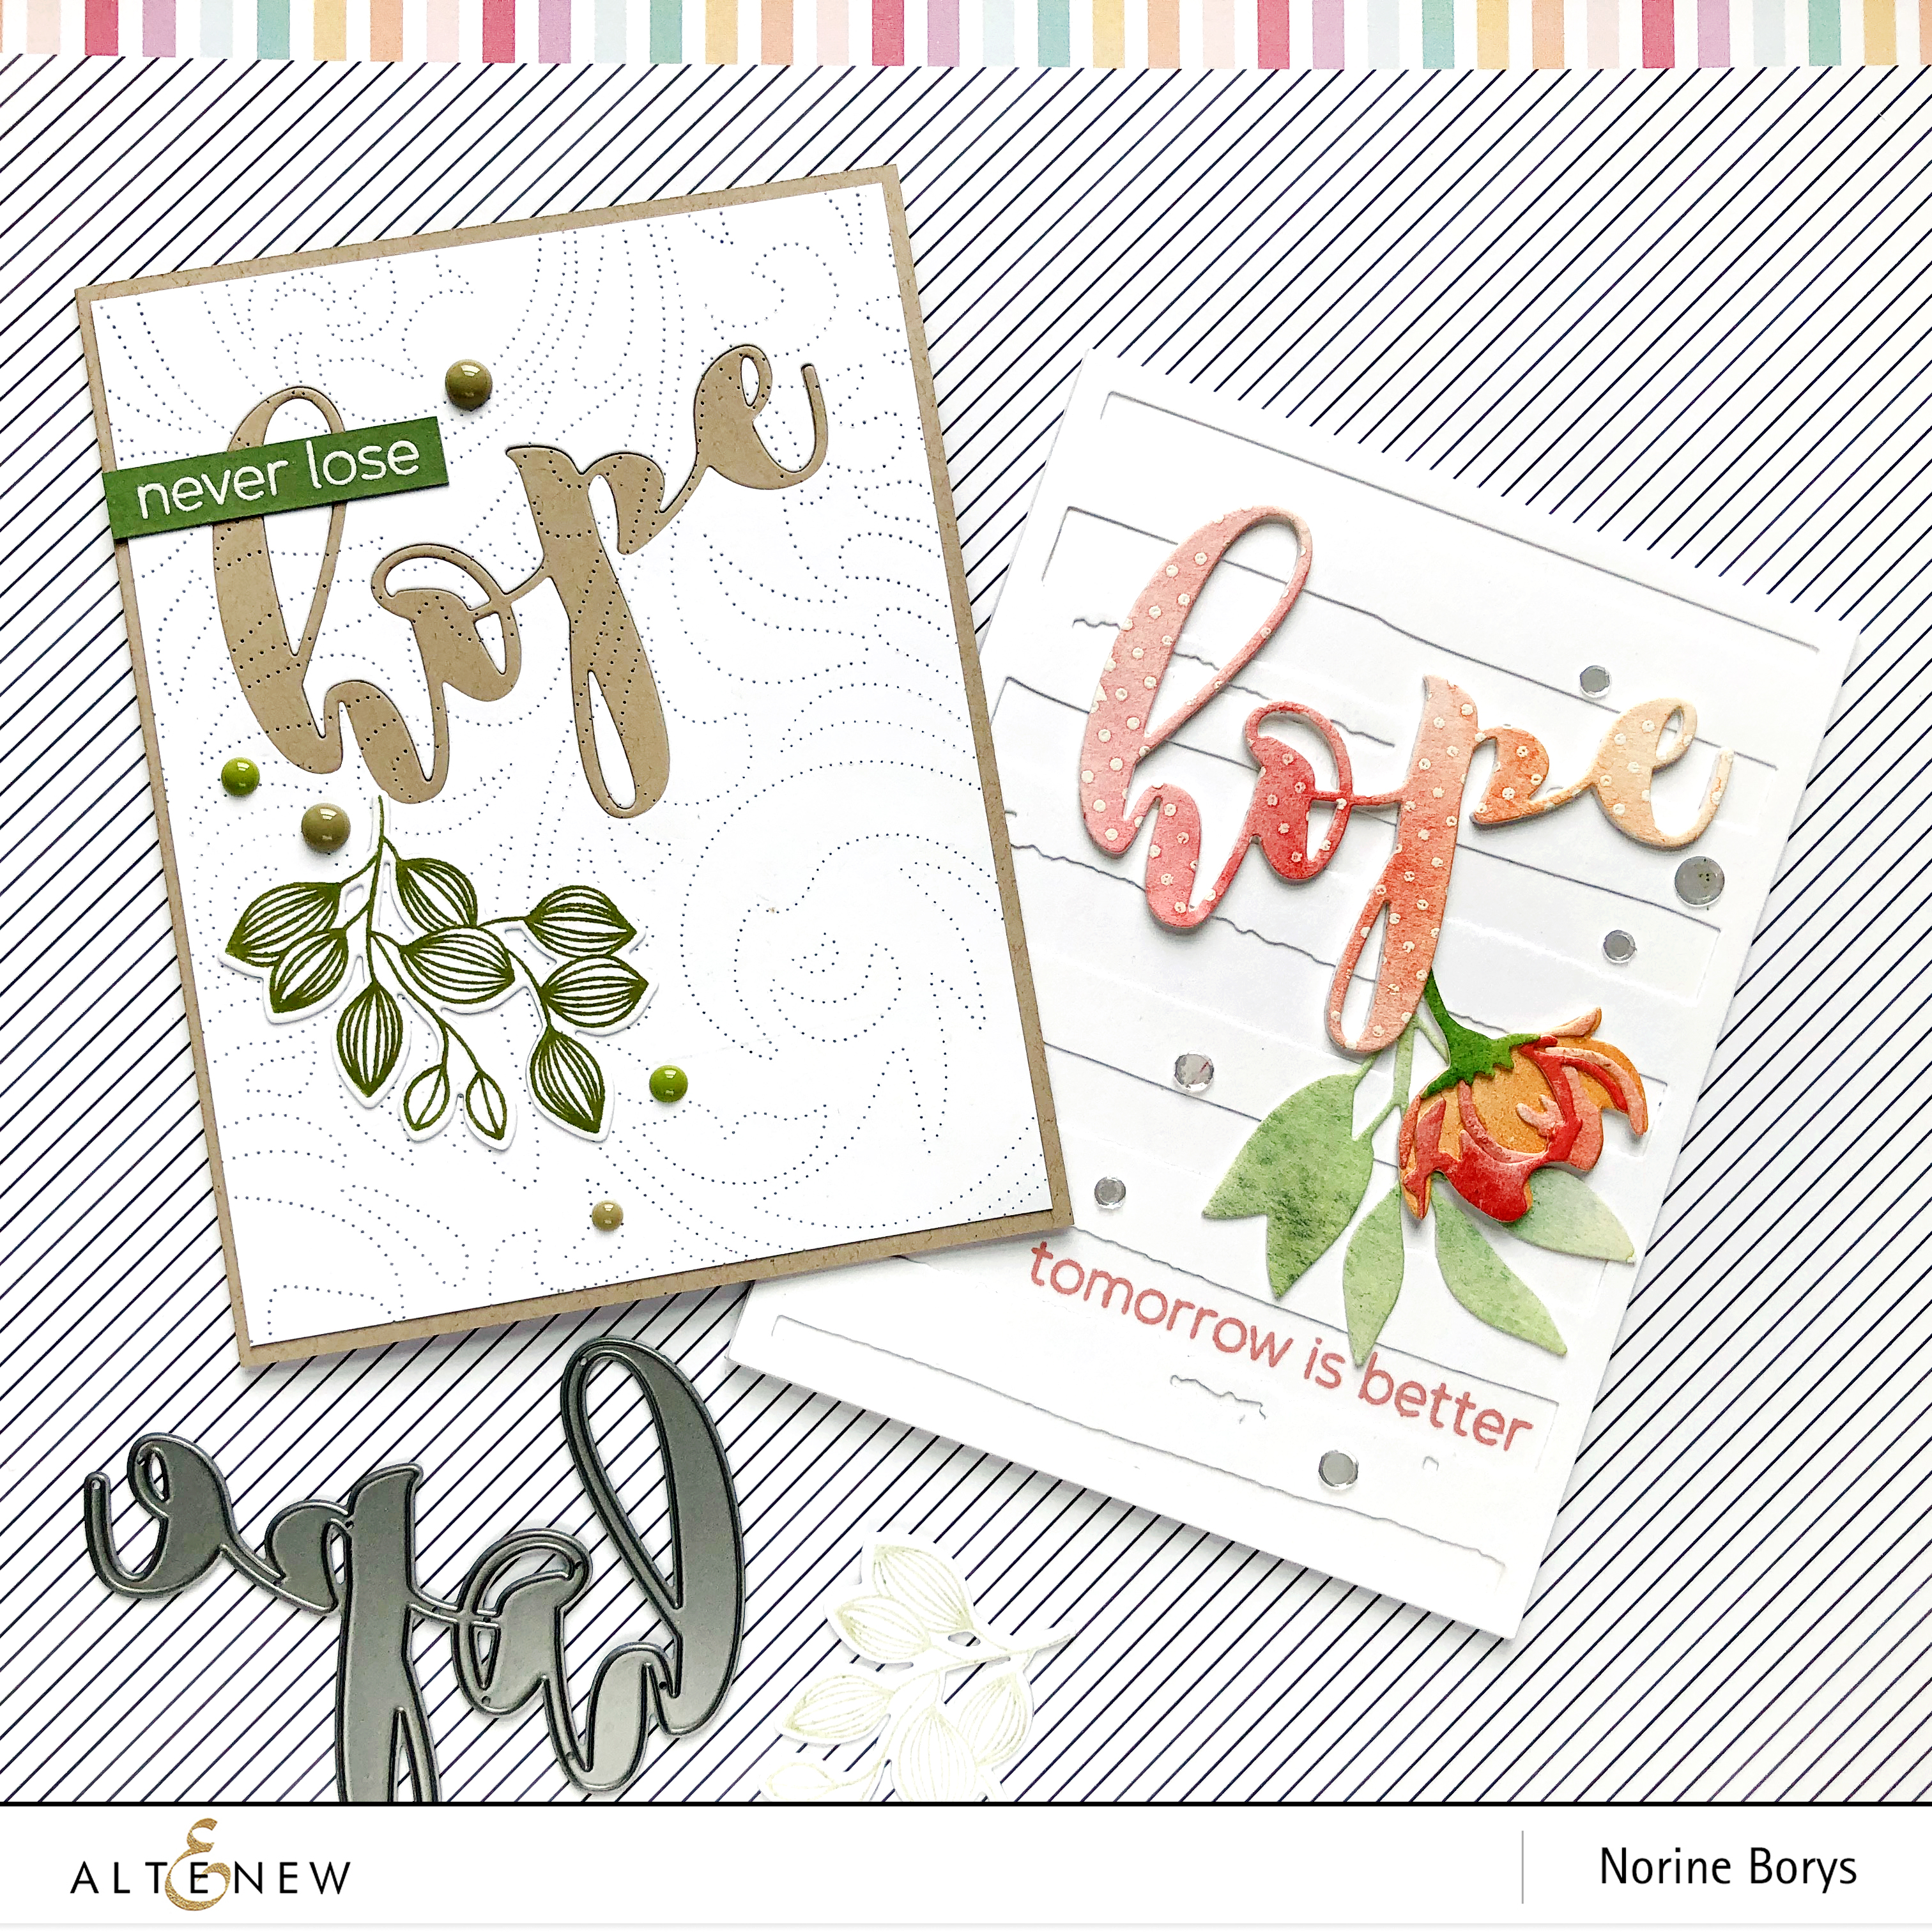
I have several projects to share with you this month, so let’s start with the Mega Hope Die.

I love stand-alone dies like this one, that look great with or without the coordinating stamp set.

For the first card, I ran an A2 sized card panel through the die cutting machine with the Dotted Swirls Debossing Die, then I lined up the Mega Hope Die in exactly the same place on both colors of impressed card panels and cut out the word.

I inlaid the kraft word into the white background taking care to not lose any of the little pieces that come out of each of the letters, and glued them into place as well. Was it necessary to create this card in that way? No, I could have simply die cut the kraft word and glued it over top of the white back ground (like I do in the following example), but there’s something about this inlaid technique that I love so much that made the extra fussing completely worth it!

I used a spare embellishment left over from another recent project to adorn the card front and taking color cues from that, I stamped the sentiment from the coordinating Mega Greetings 4 stamp set onto green cardstock and heat embossed with white embossing powder. I added some enamel dots to complete the card.

For the second card, I wanted to create a very simple background in order to keep the focus on the die cut word. I began by die cutting the Watercolor Stripes background from white card stock and adhering it to the front of a white card base.

Next, I stamped on watercolor paper with the Dainty Swiss Dots stamp set, using clear embossing ink and heat set with white embossing powder. Then I washed the background with pink and yellow watercolor paint, let it blend and dry, then die cut the Mega Hope word. I layered the painted word die cut with two more layered of card stock to give the word extra heft.

I stamped a coordinating sentiment in one of the die cut stripe openings using Rouge ink. Then I used some floral die cuts from the Virginia Rose 3D Dies, painted with the same colors as the word “hope” and layered them on the card background underneath the die cut word. Finally, a few flat, hole-less sequins complete the card.
Next, I have a couple of cards made using the Sophisticated Wreath stamp and die set.

I’m sorry, I realize it’s only July, but all I could think about making with this stamp set, were cards that look suspiciously “seasonal”. Come December, you may be seeing this stamp set again, in heavy rotation!

For the card above, I stamped a variety of the leafy images on white card stock, in several shades of Altenew’s green inks, then ink blended with Olive and Lagoon inks to create that shadowy background. Then I die cut the center of the card panel using a deckle edged rectangle die and matted it with more white cardstock.

I stamped the sentiment from the Sophisticated Wreath stamp set with the new and wonderful Obsidian black ink, then wrapped some gold twine around the 2 layers of card stock. Then I backed the deckle-cut and matted cardstock with some fun foam to provide more dimension and interest. Finally I adhered both foreground and background of the stamped card panel onto a card base making sure to position the deckle-cut panel exactly where it lines up with the background stamping.

The second Sophisticated Wreath card is comprised of a simple stamped wreath with some extra stamped and die cut components. I began by positioning the leafy image on the corner of an A2 sized piece of white cardstock, so that when flipped corner to corner and stamped a second time, it would create an oval shape. To emphasize that shape, I die cut an oval from cardstock and used it trace the shape over the stamped boughs, with 3 different shades of markers.

I stamped the leaves with Evergreen and Moss inks, and the flowers and berries with Antique Gold Pigment ink. I used the same gold pigment ink to stamp the sentiment and heat embossed with clear embossing powder. Then! Remember how I did this back here? I smeared the Antique Gold Pigment ink onto an acrylic block and used a very wet paintbrush to mix it up and splatter gold ink drops on the card panel! Such a fun effect!

To accomplish that perfectly matched mat around the card panel I rubbed the Antique Gold ink along the edges of a card base. I said perfectly matched in color…not so much perfectly inked….I did get a bit of gold ink on the edges of the back flap of the card base, but then I told myself I’m making a hand-made card here, not a perfectly soul-less Hallmark production! *shrug *grin.

One more card, whew! I saw this color combo on Pinterest somewhere and I’m sorry, but I couldn’t find the link to credit it to save my life! This card uses all the leafy elements of the Charming Doodles stamp set, stamped in Forest Glades, Olive, Evergreen, Frayed Leaf, Evening Gray, Moon Rock and White. Well, embossing ink and white embossing powder.

I began by laying a strip of masking paper along the lower portion of the kraft cardstock card panel. I stamped each of the leaves pointing up or down from that center strip, overlapping without concern for layering or using outline with filler stamps and stamping the white ones last.

Then I removed the masking paper, and stamped a sentiment from the Dainty Swiss Dots stamp set using Obsidian black pigment ink for extra richness. It felt a little underwhelming at that point, so I drew lines with black marker and a straight edge to create the bounding lines above and below the sentiment. Now I was perfectly happy with the result, so I left it at that without further embellishment, adhering the card panel to a white card base to support the white ink/embossing.
Before you go, I have one more item from the July release to share with you! I would have showed you the Stamping Mat in my own photos except that it was located where I was not, so I’ll share the Altenew photo of the stamping mat.

This silicone grid mat is great for stamping, watercolor, ink blending, heat embossing, and everyday crafting! The mat features inches as well as metric measurements on the edges and a half inch grid. Due to the nature of the silicone surface, some grid lines have slight imperfections and are not completely straight. This will not affect the quality or functionality of the mat. Please note that due to the white color of the mat, using inks or coloring mediums may stain the mat. This will not affect the performance of the mat. Material: Silicone Color: White Size: 12″x16″ Surface: One side printed with a grid, one side non-slip Heat Resistant.
Your next stop on the hop is the Altenew Scrapbook Blog. Below you will find the complete blog hop list in case you encounter a broken link.
To celebrate this release, Altenew is giving away a $50 gift certificate to 6 lucky winners! Please leave a comment on the Altenew Card Blog and/or Altenew Scrapbook Blog by 7/16/2019 for a chance to win.
We’ll also draw a winner to receive a $20 gift certificate from the comments left on each designer’s blog on the blog hop list below. All winners will be announced on the Altenew blogs on 7/16/2019.
Thank you for visiting my blog today and enjoy the rest of the hop!