Hello, hi! I am excited to join Altenew today for their Decal release blog hop! Are you all…”wait. WHAT!?” Believe me, I get it! Last winter, I was one among many, who were enchanted by the huge piece of art painted on one wall of the Altenew booth at the Creativation show. At least that’s what it looked like. I didn’t realize it was a decal and was so impressed when I learned what it was!
Here’s a photo I borrowed from May’s Instagram stories, of herself, Jen Rzasa and Ashlea Cornell taken in front of the beautiful decal I’m referring to. So you can imagine how excited and thrilled I was to learn that Altenew has created and is now selling a variety of designs and sizes in the store!
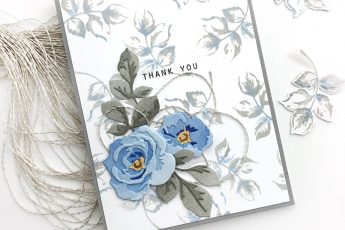
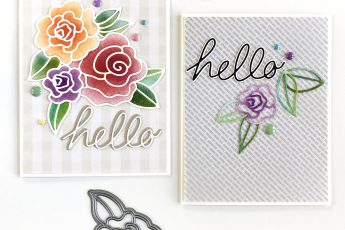
I got to play with a couple of the decal designs recently and here’s what they look like.


I ordered the Crafts Department design in medium, and cut the flowers and leaves out to combine here just above my bedside table. I love how they match the decor of the bed linens (Ikea) so well.

The rest of the words portion of this design I used in a 2nd application inside.

We are currently dividing our time between our home in Arizona and this nearly century old apartment in St Paul, Minnesota. Typically, we spend 2 weeks of the month in each place. Because the arrangement in St Paul is temporary, (while our DIL finishes her medical residency) and we are renting, my options for decorating are somewhat limited. That’s why I was SO delighted to be able to apply something so gorgeous to the walls that: 1. I can remove when we leave, and 2. if removed carefully, I can re-use somewhere else!

(I adore the “officiousness” of the font and design of this decal!)


So this large closet is my Craft Space Away From Home. It’s such a cool apartment! It’s technically only a one bedroom apartment, but this larger-than-average closet in the living room has a built-in chest of drawers, and 2 heavy-duty components attached to the door jam (right in line with the stool seat and at the baseboard) that once held a murphy-bed and turned a 1-bedroom flat into an almost-two-bedroom flat. Which is neither here nor there except for the fact that it is big in terms of closet sizes and I can easily fit all my stuff in there and work at the same time. (When I return I plan to video a mini tour so you can see what I’m actually talking about. Stay tuned to my IG stories for that!)

(Please accept my apologies for the poor lighting and photography. Being as it’s a closet, my light source was not natural and forced me to edit heavily.)


Inside this room, I used the Watercolor Bliss decal in the large size, and combined two of the largest elements of the set, along with the rest of the hand-written portion of the Craft’s Department decal.

I began by removing the carrier sheet from the back of the decal. The decal itself is still firmly adhered to the transfer sheet (which also has an amount of stick to it). I wiped the wall with a clean, dry cloth to remove any dust or grime, then temporarily taped the designs in place on the wall until I was happy with their positions. Starting in one corner, I gently peeled the transfer sheet back on itself and allowed the decal to stick to the wall. The largest piece did require an extra pair of hands, but that was mostly because I wasn’t confident in my own skills. Happily, I can say it’s very easy to do, and where necessary, it’s also easy to re-lift portions of the decal and re-position them.


I found the actual application of the decals to be very simple and straight forward. The smaller pieces were obviously easier to handle and stick on, and RE-stick on where necessary, but the larger pieces were also very manageable. The decals come with a handy-dandy little plastic spatula tool that makes it easy to smooth out any air bubbles (my walls are faintly textured from so many years and layers of paint) but I didn’t really have many of those to deal with. Straight on, you don’t see the shine of the decal, (hard to capture with a camera in incandescent lighting) but even seeing the shine from the side isn’t a huge negative for me.


Because the “crafting is in session” sentiment is decal-stuck-to-decal, instead of decal-stuck-to-wall, it will take some extra care to remove if I want to use them again, but frankly for the price point, I would simply re-order the same pieces to use elsewhere. Or by then I’ll want to use some different designs, and I’ll be able to indulge my love for changing things up without breaking the bank!

I wasn’t yet finished with these pretty decal designs!

I happened to have a canvas on hand for another purpose that didn’t pan out, and it was perfect for my idea here! I wanted to create an ethereal, drippy, matching background on the canvas to provide a backdrop for the remaining decal pieces. But I didn’t think it would work to watercolor paint on a canvas.

I began by prepping my canvas with a couple of coats of Gesso, and then 3 coats of Watercolor Ground by Daniel Smith. Watercolor Ground is a fluid acrylic medium that dries to a porous surface, allowing you to watercolor paint on it. It can be applied to any other kind of paper surfaces (and more, like wood, metal, ceramic, glass, plastic, etc!) to make it absorbent like watercolor paper. The instructions say to let it dry as long as 72 hours, but my time was limited and even though it was hideously humid in the city that day, I started the watercolor process on the background after only 24 hours. I could tell it wanted longer to dry, as the addition of more water and pigment sometimes reactivated the Watercolor Ground and made it a little sticky. Not bad enough to ruin the project, but enough to notice. I feel sure that extra drying time would have taken care of that. I flicked on speckles of colored paint once the background was dry and I love how they show through the decals!

Once the background layer of blotchy, blended colors (chosen to coordinate or compliment the decal colors) were dry, I put the decals on top. And it mostly worked! Canvas is very porous and these decals respond better to impervious surfaces like paint, glass (windows!) electronics, etc. But the decal pieces did stick and are still in place. On a few random edges that began to lift (likely related to the amount of positioning and RE-positioning that occurred) I lightly rubbed some liquid adhesive that dries clear, and pressed the edges down once more.

The finished canvas is perfectly tucked up in a little corner of my craft space next to the matching decal pieces on the adjoining wall.

Here’s a small glimpse of one side of my crafty closet and I can’t express how pleased and delighted I am with these wall decals and what they add to that little space!

Now, your next stop along the hop is Kathy Racoosin’s blog. Below you will find the complete blog hop list, but first, let me tell you about the prizes! To celebrate this release, Altenew is giving away a $30 gift certificate to 6 lucky winners! Please leave a comment on the Altenew Card Blog and/or Altenew Scrapbook Blog by 7/22/2019 for a chance to win.
We’ll also draw a winner to receive a $15 gift certificate from the comments left on each designer’s blog on the blog hop list below. All winners will be announced on the Altenew blogs on 7/26/2019.
Your complete blog hop map:
Thank you so much for visiting my blog today and enjoy the remainder of the hop!