Hello, hi! I’m joining today’s blog hop with Altenew to reveal THREE lovely new ink sets! You know how much we all love the ink color families that Altenew produces, that are perfectly coordinated and remove all the guesswork when stamping, and these three additions to the entire color line are truly beautiful! If you’ve arrived here from Vicky’s blog then you are on the right track, and if not, you can easily click back to the beginning at the Altenew Card Blog.

The three new ink families include Fall Harvest, with colors like Butternut, Pumpkin Pie and darker Amber shades. Then, there is Sugarplums – a variety of shades running from Pale Mauve to Plum, and finally, Tranquility (my favorite) with 4 sky shades from Misty Morning and Cloudy Sky to Nimbus and Dark Night. All of the colors are available in the Oval ink pads, the Mini Cube sizes and the re-inkers.

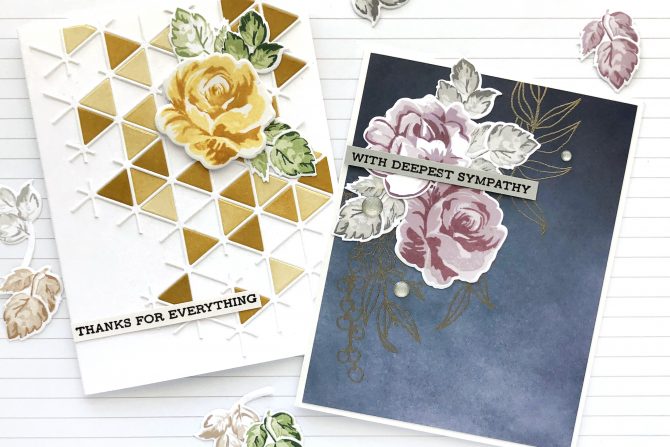
My first card showcases the Fall Harvest color family. I began by inking an A2 sized card panel with all 4 of the shades in the set, from dark to light, then die cutting the cardstock panel with the Layered Snowflake Stars Cover Die B. I die cut another piece of white cardstock with the same die and saved the outline portion of the die cut.

I cut the outline portion into an unpredictable and organic shape, adhered it to a card front, then filled in about half of the openings with a random pattern of the colored triangles die cut from the first panel.

Next, I stamped all the layers of a rose from the Vintage Flowers stamp set using the same Fall Harvest colors, as well as some leaves stamped with the Green Fields inks. I die cut each of the images and arranged and adhered them to the geometric die cut background. I love the combination of soft, romantic florals paired with the contemporary and angular background die cuts. Finally, I stamped a sentiment from the Sentiment Strips stamp set and adhered it to the card front.

My next card incorporates the two other ink families in this release. I started by inking another A2 sized piece of cardstock with all the colors in the Tranquility ink set, staying light at the bottom and going very dark towards the top.

I wasn’t sure how I would use that gradient card panel so I set it aside and when I came back to it the next day with my idea, the ink had dried completely and I was able to stamp and heat emboss with gold embossing powder onto the night sky colored background without the embossing powder sticking to the blue ink as well. I stamped one of the arrangements from the Forever In Love stamp set and let that be the background to my layered florals.

Next, I stamped 3 and 4 layers of the roses from the Vintage Flowers stamp set again, using the Sugarplums ink set, as well as some leaves stamped with the Warm Gray inks. I die cut each of those with the coordinating dies, and layered them overtop the gold embossed background.

I added a sentiment from the Sentiment Strips stamp set, stamped on gray cardstock and heat embossed with clear embossing powder. I layered that overtop the flowers and added some silver/gray sparkle enamel dots that I found in my stash.
Your next stop on the hop is to Kelly’s blog. Below you will also find a complete blog hop list in case there are any broken links along the way.
As with all Altenew blog hops, there are also prizes! To celebrate this release, Altenew is giving away a $30 gift certificate to 6 lucky winners! Leave a comment on the Altenew Card Blog and/or Altenew Scrapbook Blog by Dec 11, 2019 for a chance to win. They will also be drawing a winner to receive a $15 gift certificate from the comments left on each designer’s blog on the blog hop list below. All winners will be announced on the Altenew blogs on Dec 14, 2019.
With the addition of three new color families, there are also new color swatch charts ready for you to print out. You can either print the color layered swatch sheets or, as I do, print the blank swatch sheets and stamp them yourself for a 100% accurate ink color. If you only need the individual colors swatched without layering, you can find the color version here and the blank version here. If you plan to stamp the inks yourself, it’s best to print on the same cardstock you usually use for stamping to get the most accurate results.
Blog hop list: (It’s a long one!)
Thank you so much for stopping by and leaving a comment! Enjoy the rest of the hop!


