Hello, hi! Have you heard?! Erica (@erica_cacacraft) and I are soooo close to the 10K milestone on Instagram and we thought we’d throw a Insta-hop to celebrate and tip us over the mark! If you’re on IG, be sure to check out the hop there – we have some amazing artists and paper crafters joining us for the hop today and we have some prizes from Altenew to give away! But all the action is on Instagram!

Because Altenew so kindly and generously offered to sponsor our hop, we are using their products today to make some cards and inspire you with their awesomeness! And we’re playing with a theme of Celebration (of course) so I went with balloons! In rainbow shades! What could be happier than that??

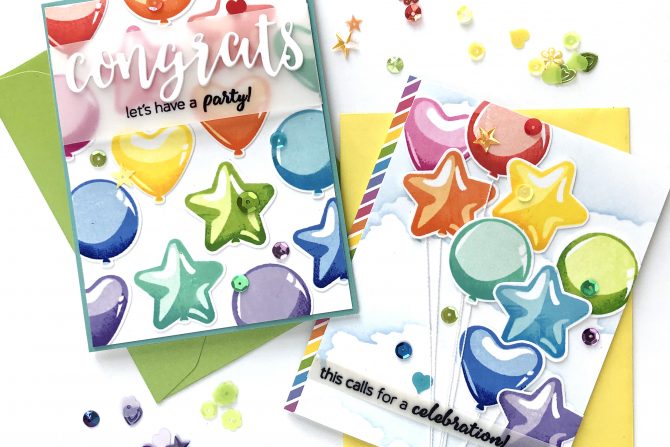
For my first card, I used the Balloon Bunch stamp set and stamped an assortment of colors and shapes. There is a coordinating die for the set as well, but I didn’t have it so I fussy cut all the shapes and taped embroidery thread to the backs to simulate strings.
The set has two layers for each balloon shape, but I used three colors of ink for each. I stamped the base layer in the lightest color, and the second layer stamp in the middle tone. Without removing the stamp or cardstock from my MISTI, I inked up just the bottom edge of each of the balloon shapes with the third (darker) shade of ink for the added dimension of shadows. The color families I used to stamp the balloons are: Tea Party, Cherry Blossom, Spring Bouquet, Warm & Cozy, Pocketful of Sunshine, Seashore, Deep Blue Seas, Glacier Caves and Enchanted Garden.

Next, I used the very clever Cloud Scene Stencil (all four sides are a different profile of clouds) with Iceberg ink and the fantastic large ink blender tool from Altenew to stencil a sky scene on a A2 sized card panel.

I trimmed the background panel narrower to let a strip of rainbow striped patterned paper peek out on the left side. I used one of the sentiments in the Balloon Bunch set to create the greeting, stamping on vellum with clear embossing ink and heat setting with black embossing powder before trimming it to a narrow strip and wrapping the ends around the sides of the card panel.

To finish the card I glued on some color coordinating sequins from Queen & Company. The “glint” of the shiny balloons makes me feel so cheerful and happy!

I stamped and cut so many balloons of so many colors that I couldn’t possibly use them all on a single card, and so I made a second one!

This time I simply adhered them to an A2 sized card panel in a descending rainbow order.

Then I die cut three layers of white cardstock using the Script Words Die and stacked and glued them together, adhering them to a vellum strip on which I stamped the “let’s have a party!” sentiment from the Balloon Bunch stamp set. Then I finished the card with more color coordinated sequins. The fact that the sequin mixes included stars and hearts – like the balloon shapes – was serendipity I couldn’t pass up on!
That’s it for my cards today, but please head on over to Instagram to see the rest of the amazing inspiration for more lovely paper crafters! Thank you so much for your constant interest and support for what I do here!! You make all the difference!


