Hi, hello! I’m up on the Altenew Card Blog today with a couple of Blossom Wreath cards and wanted to share them here as well!

The Blossom Wreath Stamp and Die Sets are a recent release that I’ve been keen to play with, so I’m glad I got the chance today!

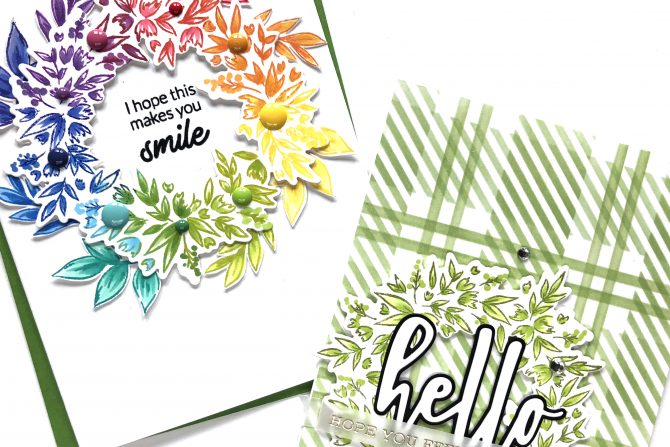
For my first card I kept things monochromatic, stamping, stenciling and coloring in shades of muted green. I started by stenciling the background card panel using the Buffalo Plaid Builder Stencil (front and then back) and the Classy Stripes Stencil and Forest Glades ink.

Then I stamped the outline image of the wreath in the Blossom Wreath stamp set with Moss Ink and colored it in with Artist Markers from Set E. I die cut the wreath with the corresponding die and popped it up with foam tape on the back.

I die cut the “hello” greeting using the dies from the Hello & Hugs die set, from white and black cardstock and glued them together, then adhered them to the front of the wreath. The banner greeting is from the Sentiment Strips stamp set and is stamped with embossing ink onto vellum paper then heat set with Platinum embossing powder. I trimmed the strip long enough to fold around the sides of the wreath and back on itself to create the banner design. Then I finished the card with some rhinestone gems from my stash.

Next up is this rainbow wreath card, an easy design to create with a MISTI stamp positioning tool. It can be done with full size stamp pads, but the mini stamp pads make it a bit easier.

I started by positioning the cardstock and stamp into the MISTI, then inking up one portion of the wreath with Heart Beat red ink. I cleaned the stamp before inking up the next section of the wreath with Marigold ink, overlapping a little bit where the red ink was stamped for a more gradual blend. I followed with Chamomile, Olive, Teal Cave, Ultramarine, Sapphire and Ultraviolet inks, cleaning the stamp between each color.

Once the stamping was complete, I colored in the leaves using matching shades of Altenew Artist Markers. I repeated stamping each of the colors with two of the mini leaf images from the Perfectly Perfect stamp set. I colored them in as well and then cut them out.

To stamp the greeting on this card I positioned the wreath where I wanted it to go and then placed the sentiment from the Wavy Roses Stamp Set in the middle. I stamped with Obsidian Black ink directly on the front of the folded card base. I popped this wreath up with foam adhesive too, lightly stuck it to the card front, then arranged the loose leaves in behind the wreath and when I was happy with the placement, firmly pressed down on the foam tape to adhere everything. I added a collection of variously sized enamel dots to the front of the wreath to complete the card.
For more details please click on over to the Altenew Card Blog. Thanks so much for stopping by today and have a wonderful day!


