Hello friends! I’m happy to joining Altenew today for their February Release Blog Hop! You should have arrived here from Kelly’s blog but if not, please click on back to the start of the hop at the Altenew Card Blog so you don’t miss anything of the new stand alone dies, stencils and decals!

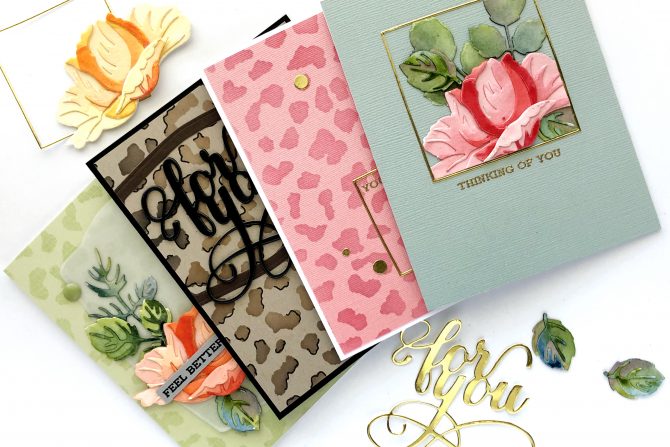
I have four cards to share with you today, using a variety of the new products including four different stand-alone dies and the Wild Leopard stencil!

For my first card, I die cut all the pieces of the Open Bloom 3D Die Set from watercolor paper then painted the pieces of the bloom with a single color of paint, but varying the amount of water in the mix, to obtain the variety of color intensities, and painted the leaf pieces with a variety of shades of paint from the new 24 pan Watercolor Paint Set, going from Rain Forest and Tropical Forest greens to a little Cool Summer Night blue and Shades of Purple violet.

Once dry, I assembled and adhered all the layers of the bloom and some of the layers of the leaves. Next, I die cut some heavy gold foil cardstock using the Fine Frames Square Die Set. (I LOVE this die set and I know it will be in heavy rotation!)

Using the thin gold square frame as a guide, I trimmed the layered pieces of the Open Bloom 3D floral to perfectly fit into the opening of the square frame. I positioned a sentiment stamp from the Sentiment Strips Stamp Set and gold heat embossed it to match. I find that when stamping a fine detail stamp like this sentiment onto textured cardstock, I need to use a stamp positioner tool and stamp and heat twice to get a little more build up of embossing powder. It’s important not to press down super hard so you don’t mush the stamp impression, but just patiently stamp lightly a few times, heat emboss and then go back and stamp lightly again over the first impression and heat emboss again.

My second card uses the Open Bloom 3D Die Set again, but this time I painted the blooms with shades of Warm & Cozy and Tea Party paint colors.

I used the Wild Leopard Stencil to add some pale pattern to a card panel of pale green cardstock. I also die cut a piece of vellum paper using the Nesting Frames Die Set to provide a visual “base” for my floral arrangement.

After adhering the vellum to the card panel, and the layers of the flower and leaves, I stamped a partial sentiment (did some stamp amputation) from the Sentiment Strips Stamp Set on grey cardstock and added it overtop of the bloom. Three different colors and sizes of enamel dots from my stash complete this card.

I have a little 1.5 year old grand-daughter and I find that my love for things like PINK LEOPARD PRINT (something I would never have expected to like) is growing! So I had to make a card like this one!

This card goes together really quickly and simply. After blending the color on with the Wild Leopard Stencil, I trimmed it narrow on the sides to allow the white card base to mat the pink card panel. I stamped another sentiment from the Sentiment Strips Stamp Set and heat embossed with gold. Then I added the smallest of the three Fine Frames Square Dies Set, die cut from heavy gold foil cardstock, and added a single little leaf arrangement from the Open Bloom 3D Die Set.

For the little foil “sequins” I used two different sizes of hole punches to punch out more of the gold foil cardsock so the match would be exact, and glued them in random places much like I would with enamel dots.

My final card uses the Wild Leopard Stencil in a slightly more typical color scheme. I stenciled on kraft cardstock and then added some additional detail by partially outlining the spots with a black liner pen.

I die cut the “for you” sentiment from shiny black cardstock, using the Fancy For You Die and then two more layers from plain black cardstock. I glued those layers together and positioned them over a frame of brown cardstock that I made by die cutting TWO of the Nesting Frames Dies together and die cutting them in one pass.

I created a black glossy mat for the trimmed down leopard print card panel by running embossing ink along the edges of all four sides of the card base, then heat embossing with black embossing powder. Then I added some black glossy enamel dots to match, and that completes my cards for today!
Your next stop on the hop is Amanda Baldwin’s blog. In case you encounter any broken links along the way, I am including the complete blog hop list below.
As always, there are prizes! To celebrate this release, Altenew is giving away a $30 gift certificate to 6 lucky winners! All you need to do, is leave a comment on the Altenew Card Blog and/or Altenew Scrapbook Blog by March 3, 2020 for a chance to win. They will also draw a winner to receive a $15 gift certificate from the comments left on each designer’s blog on the blog hop list below. All winners will be announced on the Altenew blogs on March 6, 2020.
Thanks so much for stopping by today and enjoy the rest of the hop!


