Hello again, welcome back for Day 2 of The Greetery’s Winter Wanderer reveal! If you loved the hoop and macrame textures and designs, you won’t be disappointed today because we have even more in store for you! Today is the remainder of the reveals, tomorrow is turkey day, and Friday the release goes live in the shop! (hand clapping emoji!)
If you’ve arrived here from Kelly’s blog, you’re right on track, and if not, you can start at The Greetery blog and not miss a thing! Below will be a full hop list for reference. Be sure to read to the bottom for other necessary info, including Black Friday sales!

The products being revealed today:
- Simply Wonderful stamp set + die
- Opposites Attract stamp set + die
- Boho Banner die
- Bigger Blooms stamp set + die
- Macrame Borders & Tassels die
- Macrame Diamonds die
- Macrame Openwork base die
Let’s jump right in!

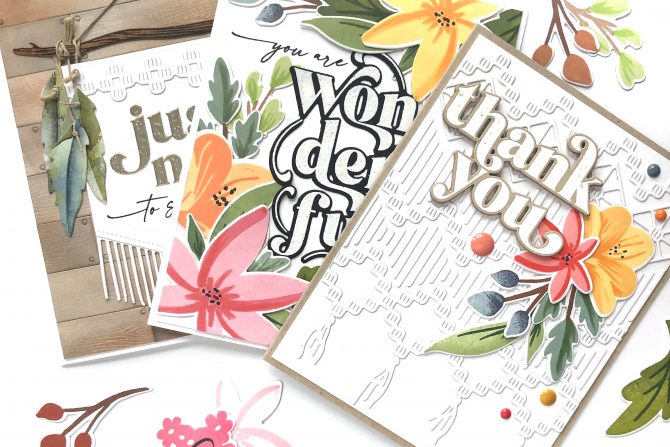
For my first card today, I once more reached for the Shiplap Builder set, ink blending with brown and smoky blue inks to create the background panel.

I used the Boho Banner Die set to create the rest of the card, cutting the banner, fringe, branch and decorative trim from white cardstock. I found a scrap of blue/green watercolored paper in my stash bin and die cut the feathers from that.

I inked the branch and added more definition by running a brush tip marker sideways over the die cut to accent the texture. I used the thinnest jute I could find in my craft bins – probably for jewelry making I’m thinking? – and made a hanger by wrapping it around the branch and poking holes in the banner to thread the jute through before tying off with a knot. The feathers are hung similarly and adhered in place.

I used the Opposites Attract stamp set to create the greeting on the banner, heat setting with Platinum embossing powder. The fine lined and elegantly handwritten accompanying greetings in this set are a hallmark of The Greetery stamp sets and another of the things I love most! I stamped this one simply with black ink.
The decorative trim along the top is from the Macrame Borders and Tassels Die set and the “nail” holding up the string, is just a shiny metallic colored enamel dot, positioned and adhered with extra glue.

My next card is a little bit fussy. Which I like, but I recognize that not everyone has the time or need for shenanigans such as these! I used the Macrame Openwork dies, the Macrame Diamonds dies and the Macrame Borders and Tassels dies, cutting everything from white cardstock and adhering to white cardstock for a subtle tone on tone texture.

If you notice though, adhering all the background wasn’t quite as simple as it first appears. The two rows of vertical lines in a zig zag and diamond pattern, are the discard portions of the Openwork dies. Punching them out and keeping them in the right order, meant I could lay the positive part of the die cut in place and apply tiny liquid adhesive dots to the back of the vertical pieces and position them in place exactly where they should be!

Once the background was finished, as difficult as it was to do, I covered some of it up with a stamped and die cut sentiment from the Opposites Attract stamp and die set, and a small flower arrangement from the Bigger Blooms stamps and dies. For the “thank you” I die cut a kraft colored layer of fun foam to adhere behind the stamped greeting for even more texture.
To know how I stamped the flower pieces, refer back to my blog post from yesterday where I describe a stress-saving technique that works amazingly. I used Altenew inks for all my stamping, (their color families make it choosing coordinating shades so easy) and added some extra shading details with Copic markers.

The last card is FULL ON Bigger Blooms! I die cut and stamped a bunch so you’ll be seeing more in future, to be sure. I die cut and stamped (with Versamark and white embossing powder) the “wonderful” sentiment from the Simply Wonderful stamp and die set, positioned it in the center of the card, and added the “you are” stamp.

Then I filled in around the edges with all the flowers, leaves and stems, adhering in place, then trimming off the edges to be slightly smaller than A2 size. This is a fantastic way to make a card with random stamped die cuts from and and all of The Greetery’s sets!

The ink colors used for the die cuts include the Red Cosmos, Red Sunset, Warm & Cozy, Golden Sunset, Green Fields, Tropical Forest and Tranquility ink sets from Altenew.
In addition to the stamps and die sets we’ve been sharing yesterday and today, there are a couple of other new products that are amazing and awesome!

First, remember the Speed Tagging Die from last year, and the amazing printed sheets that die cut tags just as quick as zip, zap, zoop!? Well there are two more sets of tags, and they include 2 each of three different patterns, so 6 sheets = 42 individual tags in each package. I like to double mine up, and often use the tagging die to cut coordinating patterned paper to pair with these tags! Shown above are the Happy Christmas Prints and below is the Classic Christmas Prints.

Do you notice anything else that’s cute?? That’s right, pens!! They come 3 in a pack for $6 and coordinate with the tag sets which to my mind makes for a sweet little gift for a crafty friend! The tag papers are available in the shop already, and the pens will go live with the rest of the release on Friday morning.
Your last stop on today’s hop is Wanda’s blog and the complete hop list is below, just in case. Remember to leave a comment on each of the stops for a chance to have your name/comment drawn to win a $50 gift card for the Day 2 blog hop. Winners will be announced Friday morning when the release goes live. All of the new products being showcased today will be available for purchase beginning at 10am ET on Friday, November 27 in the shop.
As well, there will be a 15% store wide sale starting Friday morning when the release goes live in the store, and includes the new items! Don’t miss out!

Complete Blog Hop list:
Norine Borys – You are here.
Thanks so much for stopping by and have an amazing day!
Supply List:


