Hello and welcome hoppers! I’m so glad you’ve found your way here for the Altenew November Release blog hop! If you’ve come from Kelly Jane’s blog, you’re just where you should be, but if not, you can click back to the beginning at the Altenew Card Blog and that way you won’t miss anything.
I have a lot to share today, so lets jump right in!

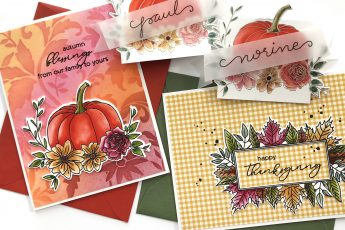
For my first two cards, I used the Wavy Outlines Dies – which incidentally, match the Wavy Roses Stamp set.

I began by positioning all the bloom and leaf dies on a piece of white cardstock and running them through the die cutting machine. Rather than removing the die cuts from the cardstock, I taped down the back so all the little bits of the design would stay in place and not fall out to get lost.

Flipping the taped cardstock over to the right side, I ink blended the various blooms and leaves using Altenew inks, started with darker, more intense color in the center and blending very lightly out towards the edges. Because I left all the pieces in place, it was easy to see where the color needed to be lighter or darker. I used Golden Sunset colors for the yellow flower, Enchanted Garden for the purple flower and Red Sunset for the red flower. I did the same for the leaves, combining Forest Glades, Sea Breeze, Dusk and Moss.

I die cut all the same shapes a second time, from white cardstock and pushed out all the sections so I could replace them with the ink blended sections. I used double sided tape on the back to hold the pieces in place as well as adhere them all to the card front. I die cut the skinny word hello (Handwritten Hello Die) from white cardstock and the shadow word from kraft cardstock and glued them offset to look like a shadow. I adhered everything to some gingham patterned paper and added a few matching enamel dots.

For my second card, I used the outline die cuts from the previously ink blended shapes and arranged them into small clusters.

A couple of the leaves I simply overlapped and adhered, but for the small purple bloom, I layered it over the two leaves and trimmed them so that they appear to be tucked behind the bloom.

This time I die cut the skinny hello word (Handwritten Hello Die) from black cardstock and the shadow portion from white cardstock and layered them together. To assemble the card, I added a layer of vellum paper overtop of some text patterned paper to give it a more subtle influence on the overall card, and added three coordinating enamel dots.

My next card is made using components of the Poppy Garden stamp set. This is a beautiful bouquet builder set that I will certainly be reaching for often!

For this card, I stamped a single bloom and some leaves onto Neenah Solar White cardstock with alcohol marker friendly ink, Memento Tuxedo black ink. I colored them with Altenew (alcohol) Artist markers and hand cut the image. (There are matching dies, but I don’t have them.) For the background, I stamped some images from the Leaf Clusters stamp set with shades of Frayed Leaf, Forest Glades and Sea Breeze inks onto a folded card base. I also layer-stamped the leaves from the Wild Ferns stamp set with the Green Fields inks and die cut them to layer.

I positioned the leaves and bloom so I would know where to stamp the sentiment, then stamped with the “thinking of you” sentiment in the Poppy Garden stamp set, using Obsidian black ink and stamping right on top of the leaf image. I adhered all the layers of leaves and the bloom onto the card base and this card is complete.

The last card today also uses the Poppy Garden stamp set, but I used only the leaf stamps to create it. I love everything about fall except that it means summer is over and winter is coming. Not a fan of winter. LOVE summer. And I love fall stamping and coloring. So, leaves.

After stamping the leaves in a cascading fashion, and coloring them with Altenew alcohol ink Artist Markers, I die cut the “thanks” word (Fancy Thanks Die) but left it still in the cardstock. I used the “for everything” stamp from the Sentiment Strips stamp set and stamped with Obsidian black ink right on top of the die cut word.

To complete the card, I trimmed the card front narrow than the folded card base, by 1/4″ on each side and adhered them together. No enamel dots or other embellishments this time….just a clean and graphic thank you card!
Your next stop on the hop is the Altenew Scrapbook Blog. Below you’ll find a complete blog hop list in case there are any broken links.
As always, there are prizes! To celebrate this release, Altenew is giving away a $50 gift certificate to 6 lucky winners! Please leave a comment on the Altenew Card Blog and/or Altenew Scrapbook Blog by 11/13/2019 for a chance to win.
They’ll also draw a winner to receive a $20 gift certificate from the comments left on each designer’s blog on the blog hop list below. All winners will be announced on the Altenew blogs on 11/16/2019.
Thank you for hopping with us today!
Norine Borys – You are here.