Hi there, hello! Glad to see you back! Today is the Blog Hop for the Altenew November release of Stamps, Dies, Stencils and Embossing Folders! I don’t have something in all of those categories to share, but I did make 5 cards using some of the above product types! If you’re following on the hop, you’ll be arriving here from LauraJane’s blog, but if not and you’d like to, just click back to the start at the Altenew Card Blog.

My first collection of cards showcases the Cartoon Rose Stamp and Dies Sets. It’s a set that includes the outline stamps for a full bloom rose as well as a bud, four layering stamps for each of the flowers and 2 outline leaves.


I began by setting up my MISTI stamp positioner tool to stamp an endless array of blooms and buds and then set about to use as many color families in the Altenew Ink line as I could – about 12! Setting up the positioner to stamp first the outline stamps, then all the color layer stamps makes it easy to turn the process into an assembly line for multiple card making sessions.


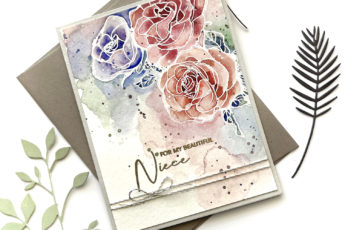
For the card above, I combined 4 of the different colors of flowers into one bouquet. The pink bud is stamped with the Rose Petal ink set, the blue bud with the Lapis Lazuli set, the purple flower with Enchanted Garden and the yellow flower is the Golden Sunset ink family.

Because I liked the “cartoon” style of the layering stamps for the flowers, I decided to imitate that for the leaves. The set doesn’t include any color layering stamps for the leaves and cards designs with the leaves left uncolored look quite striking, but even knowing that, I decided I wanted to color my leaves in a similar “cartoon” style. I combined 3 different green Artist Markers, decided where the shadowed areas would be, and colored with smooth curved color areas similar to cartoon shading.

I stamped the greeting that is included in the Cartoon Roses stamp set, with Obsidian Pigment Ink and heat set with clear embossing powder. Then I added a narrow strip of brightly colored plaid patterned paper that coordinated nicely, and a few matching enamel dots. Because I can. And often do!

Card #2 is made with roses and bud stamped with the Warm & Cozy Ink set, and arranged with three flowers and assorted leaves on a matching background of random patterned papers in my cut-offs bin.

One thing I’m going to share. In the process of stamping all the layers, I felt initially that using all four of the colors in the stamp families was too much contrast for color variation, so I thought I’d outsmart myself and double up on some layers by stamping the lightest color for the solid color layer, then stamping the next layer with the same color but stamping twice or three times to layer on more ink and (hopefully) get a more subtle shading gradation. Well, I’m here to tell you to trust the inks and don’t worry about being subtle. The charm in these flowers is the cartoon-style of the color layering and the more marked the color shades, the cooler they look! Quite often, where I doubled up stamping layers with the same color, as the ink dried, they faded into each other so that you could hardly tell one color layer from the next, and I don’t love that as much once finished.

I stamped a greeting on this card from another of the stamp sets in this new release, the Better Together 2 Stamp Set, again stamping with Obsidian Ink and clear embossing. I’m sure you’ll agree that the card is busy enough to not need any more embellishments this time ’round!

My last card in this set is a tad more “restrained” than the first two. I used a bloom colored with the inks in the Cool Summer Night ink set. Oh, I forgot to mention earlier….after stamping all the layers of all the flowers and leaves, I used the coordinating Cartoon Roses Dies set to cut out all the pieces. Times like this when I’m coloring a bunch of shapes for who knows what future project, is when I really appreciate coordinating dies! Fussy cutting is fun, but only to a point.

I stamped a greeting for this card from the Eucalyptus Jar stamp set – the circle shaped thanks stamp. I used Gray Denim to stamp with and then die cut the greeting with the matching die for this set as well.

I found a lovely piece of gray striped paper in my stash box – matching the Gray Denim ink perfectly, and I trimmed it to fit narrower than an A2 sized card front, with a portion cut off the bottom, so that the flower and leaves overlap that edge and keep the eye focused on them. And to finish, some matching enamel dots!

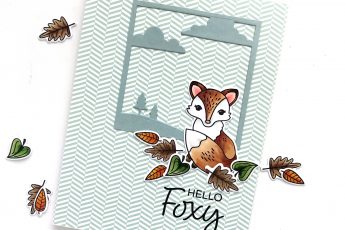
Next up, I have a couple of cards that show two different ways with the Eucalyptus Jar stamp and die set PLUS a new product that makes me very happy – a Fine Liner Pen Set!

Both of these cards are stamped onto watercolor cardstock, but for the first card, I stamped with Obsidian Pigment ink and heat set with clear embossing powder.

I painted it quickly and simply, letting the stamped outlines do the work of showing the image. I added more paint to the background and splattered paint specks once the painting was dry.

I stamped a greeting from the Eucalyptus stamp set and heat set it with embossing powder too and added some black enamel drops to finish. A lovely image with an encouraging sentiment!

For the second card I stamped the image with very pale Limestone ink, just enough color to let me see where to paint. Then I attempted a version of no line coloring with my watercolor paints – the Watercolor 36 pan paint set – painting in the jar, leaves and stems.

I wanted to do my favorite style of art – watercolor with pen and ink, and these fantastic new liner pens were perfect for that!

Once the image was painted and the background shading added, I loosely outlined some of the picture. I like the pen work to merely suggest shape and definition and fewer lines do that better than too many. I love how the fine lines give the effect of lightness and airiness.

The “miss you” sentiment is also from the Eucalyptus Jar stamp set and compliments the pen and ink look perfectly.
So that’s what I have for you today, but check out the rest of the hop for much more inspiration! Your next stop on the hop is Vicky’s blog and in case of any broken links along the way you can refer back to the complete blog hop list below.
There are some special promotions with this release:
- Get a FREE brand new Twinkle & Shine Stamp & Die Release Inspiration Booklet (worth $5.99) with every order of high-value Twinkle & Shine release bundles. Shop HERE! *Exclusions apply.
- Get a FREE brand new Online Cardmaking Class with every order from the new Twinkle & Shine Stamp & Die Release collection from 11/04/2020 through 11/10/2020. Shop HERE!
- Get a FREE brand new Twinkle & Shine Stamp & Die Release Mini Inspiration Booklet with every order from 11/04/2020 through 11/06/2020. Shop HERE!

Giveaway Prizes:
To celebrate this release, Altenew is giving away a $50 gift certificate to 3 lucky winners! Please leave a comment on the Altenew Card Blog by 11/10/2020 for a chance to win. Altenew will also draw a winner to receive a $15 gift certificate from the comments left on each designer’s blog on the blog hop list below. All winners will be announced on the Altenew Winners Page on 11/12/2020.
Blog Hop List:
Thanks so much for stopping by and enjoy the rest of the hop!